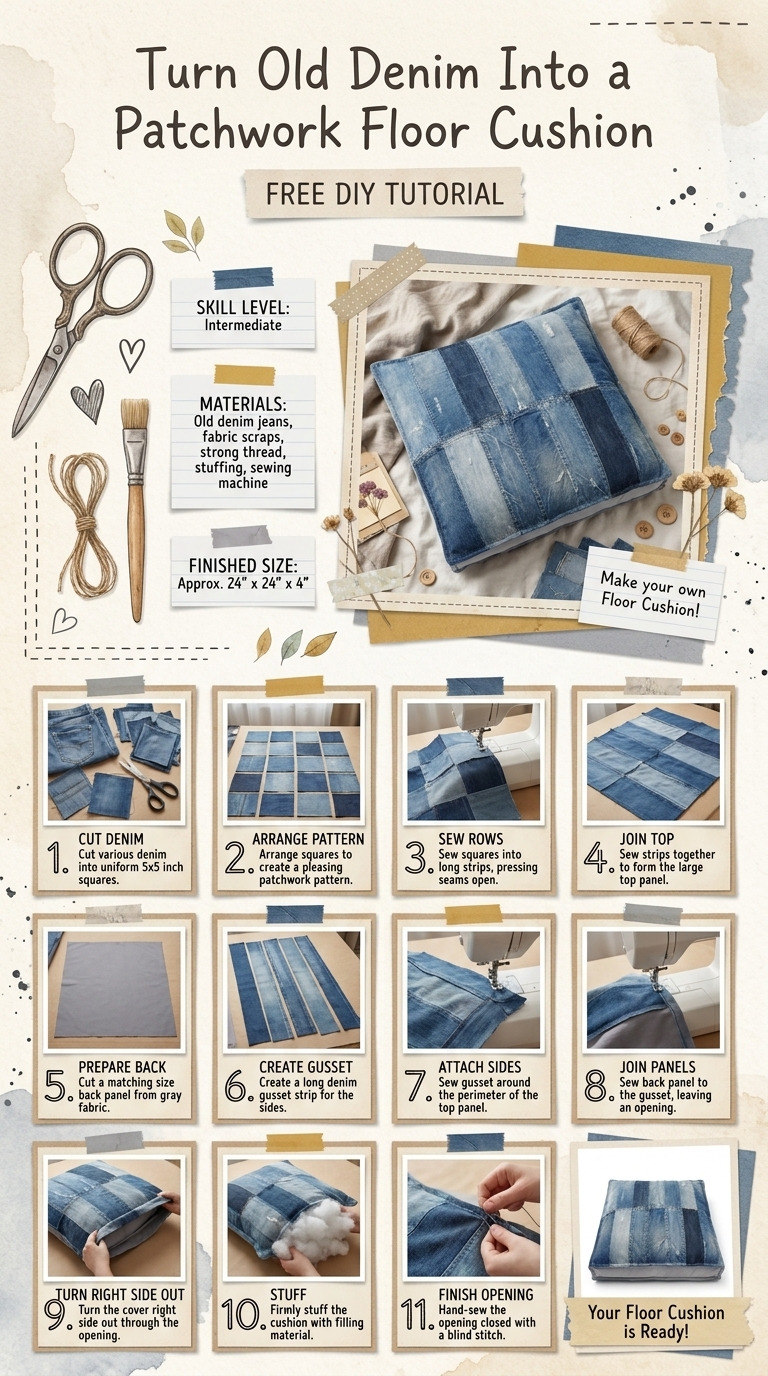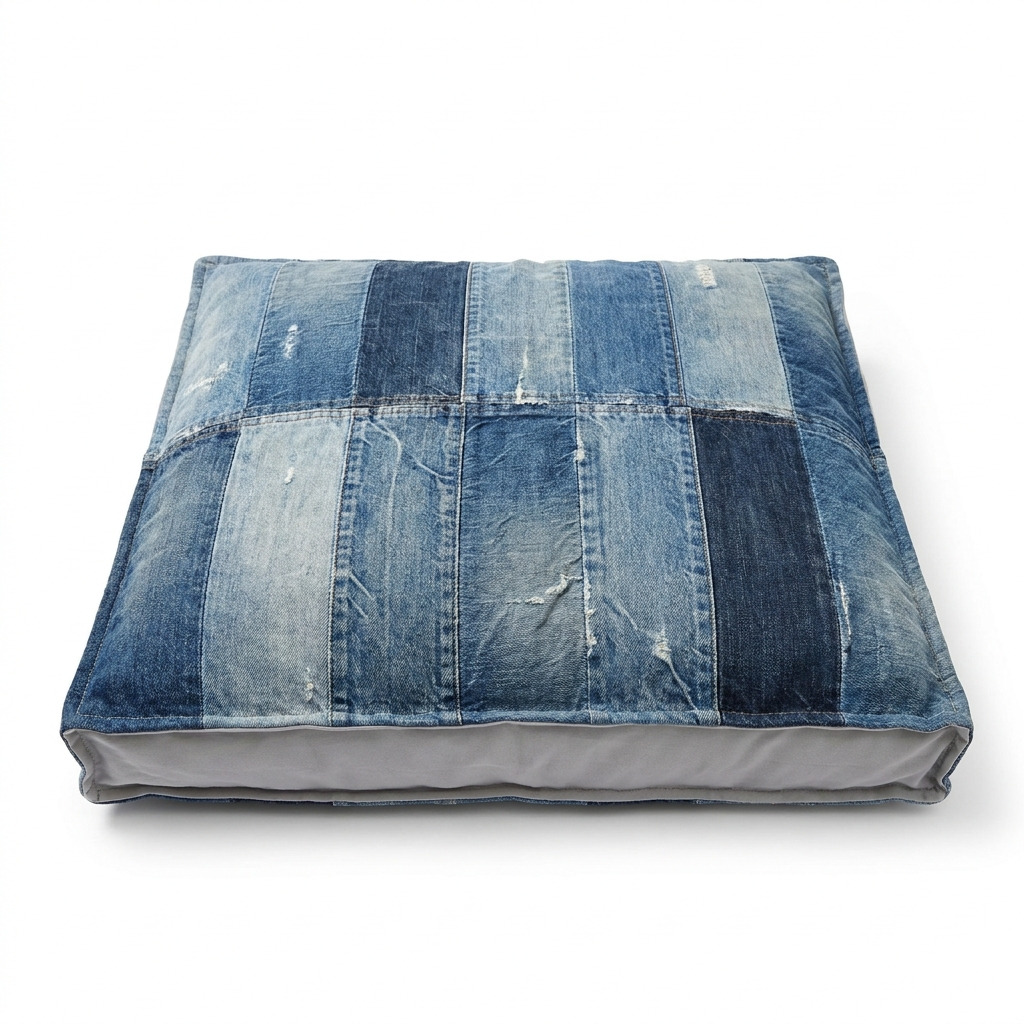
A few winters ago, I found myself with an old pile of denim jeans, far too frayed and worn to wear but too beloved to toss. It got me thinking about how I could turn them into something cozy and functional for our living space. That's when the idea of making a patchwork floor cushion hit me! This cushion has become my go-to spot for reading by the fireplace and a comfy seat for impromptu movie nights with friends. Plus, it's a fantastic way to upcycle and give those jeans a second life!
In this project, we’ll turn those old jeans into a beautiful and comfortable floor cushion that’s perfect for lounging. It's an easy DIY that anyone can tackle, even if you've never sewn before. I’ll walk you through every step, so you’ll get a lovely, soft cushion that’ll add a pop of style to your room!
[Descriptive image caption of the finished project]
What You'll Need
Materials:
- Old denim jeans: 4 pairs (Choose various shades for a beautiful patchwork effect!)
- Cotton fabric for lining: 2 yards, solid color (white or light gray works great)
- Polyester fiberfill stuffing: 1 large bag (around 24 oz will do)
- Sewing thread: 1 spool, matching colors for denim and lining (think navy blue for denim and white for lining)
- (Optional) Fabric patches or embellishments for decoration
Tools:
- Fabric scissors: 1 pair (Sharp scissors will make cutting much easier)
- Pins or fabric clips: 20 pieces (These help hold your fabric together while you sew)
- Sewing machine with universal needle: 1 (Or you can hand-sew if you prefer)
- Iron and ironing board: 1 set (Pressing the fabric really helps your seams look polished)
Extra Tools:
- Fabric cutting mat: 1 (If you don’t have one, a flat surface works too)
- Rotary cutter or straight edge ruler: 1 (Not essential, but it makes cutting straight lines a breeze)
- Measuring tape: 1
Preparation & Setup
First things first, let’s set up your workspace! Clear a large, flat surface and lay down your cutting mat. This way, you have room to spread out your materials comfortably.
Before we dive in, a quick note on preparing your fabric: Make sure to wash and dry your denim and lining fabric first. This will eliminate dirt and any shrinkage later on. After washing, give everything a good press with your iron to make sure it’s nice and flat. Nobody likes sewing with wrinkled fabric!
Now for the cutting! You’ll need to make some specific pieces:
- Cut 15 strips from the jeans, each measuring 4 inches wide by 8 inches long.
- Next, cut 5 squares for the cushion—each 24 inches by 24 inches—out of both denim and lining fabric.
How to Make It, Step by Step
Step 1: Prepare the Denim Pieces
- Start by taking your old denim jeans and cutting them into usable pieces. Snip off the legs and pockets so you have the flat fabric to work with.
- Using your fabric scissors, cut 15 strips that are 4 inches wide by 8 inches long. Aim for a mix of light, medium, and dark denim for a lovely patchwork effect!
Step 2: Create the Patchwork Design
- Now it’s time to get creative! On your flat surface, arrange the denim strips into a square layout, mixing and matching the colors as you go. Feel free to play around until you find a design that makes you happy—it’s all about what you like!
Step 3: Sew the Patchwork Top
- Once you're satisfied with your layout, pin the denim strips together. Make sure the edges align nicely—this will help when sewing.
- Take your sewing machine and sew the strips together using a 1/4 inch seam allowance. This means you’ll sew a quarter of an inch from the edge of the fabric. After sewing, press the seams open with an iron to reduce bulk and make it look neat.
- Trim the edges of your panel to ensure you have a perfectly straight 24-inch x 24-inch square. You want everything to fit together nicely!
Step 4: Create the Cushion Bottom and Lining
- With your lining fabric, cut 2 squares that measure 24 inches by 24 inches. This will be the base of your cushion.
- Pin one of the lining squares and sew around three edges, leaving one edge open (use a 1/2 inch seam allowance here). Remember to backstitch at the beginning and end of your seams to keep everything in place!
Step 5: Assemble the Cushion
- Now, let’s assemble it! Turn your lining inside out and fill it with polyester fiberfill. Do this gradually, packing the stuffing until the cushion feels firm but still soft. It’s all about comfort!
- Once you’re happy with how much stuffing is inside, pin the open edge closed and sew it shut with a slip stitch or machine sew for a seamless finish.
Step 6: Attach the Patchwork Top
- For the final touch, fold the lining into the patchwork top, aligning the edges carefully. Pin them together to keep everything in place.
- Sew around the perimeter of the cushion, using a 1/2 inch seam allowance. Make sure everything is secure before you move on!
Assembly & Finishing
Now that you have sewn everything together, clip any excess fabric to prevent bulk. Turn the cushion right-side out and give it a final press with the iron to make everything look neat and polished.
If you want to add some flair, this is a great step to embellish! Consider stitching on some fabric patches or doing decorative stitching along the edges for added character.
Common Mistakes to Avoid
- Rushing the glue. If you decide to use fabric glue for any patches, let it dry fully before handling. Missing this step can lead to peeling or lifting later.
- Not pre-washing fabric. I made this mistake once, and my cushion shrank after the first wash! Always pre-wash your fabric to avoid unexpected surprises.
- Ignoring seam allowances. Forgetting the seam allowance can warp your dimensions, leading to mismatched edges while sewing. Double-check as you go.
- Overstuffing. While a cushy pillow is nice, overstuffing can make it hard to sew the final seams. Aim for a balance—ask yourself: does it feel comfortable?
- Skipping pressing seams. Neglecting this step means all your hard work can end up bulky and less polished. Always press those seams!
Make It Your Own: Variations and Ideas
- Play with Colors. Try using denim with fun colors or patterns for a unique twist on your patchwork design!
- Experiment with Materials. If denim isn’t your thing, feel free to use corduroy or canvas—both add great texture and personality.
- Size It Up or Down. Want a bigger cushion? Grabbing more fabric and increasing your square size can create a cozy sofa-sized cushion.
- Custom Shapes. Instead of a square, why not experiment with a circular or heart-shaped cushion for a fun design touch?
- Gift It! Consider making smaller versions as gifts or for kids’ rooms. They make great floor pillows!
I can’t wait to see what you come up with! Remember, crafting is all about making it your own and enjoying the process.
Before You Go
Pin this for the next rainy afternoon: Save this tutorial to your Pinterest boards so you can find it easily the next time you have old jeans and want to make your very own patchwork floor cushion.
Come back and tell me how it went: I would love to hear from you about your experiences or any questions you have along the way. No question is too basic, and remember, a project that didn’t go quite as planned is still a story worth sharing!
Show off what you made: If you finished your cushion, I’d be thrilled for you to share it! Happy crafting!