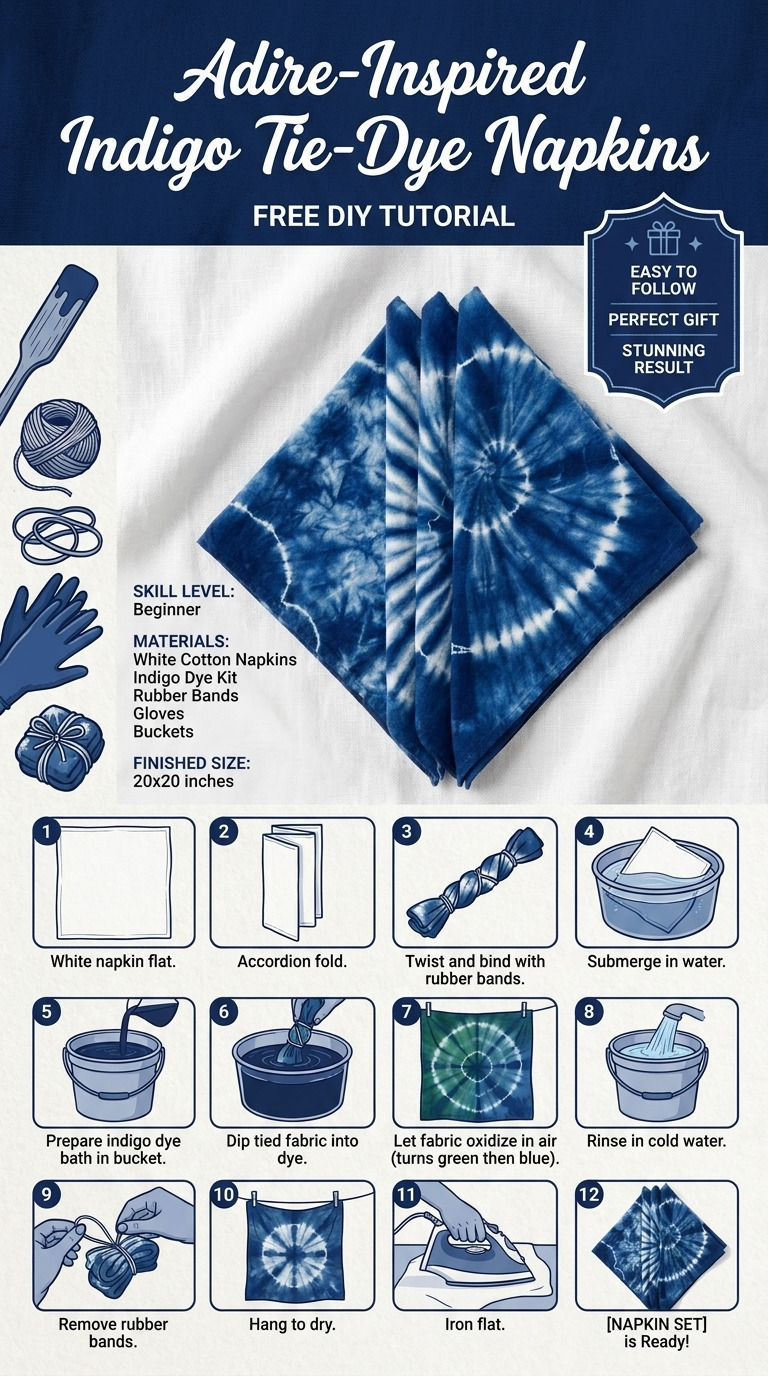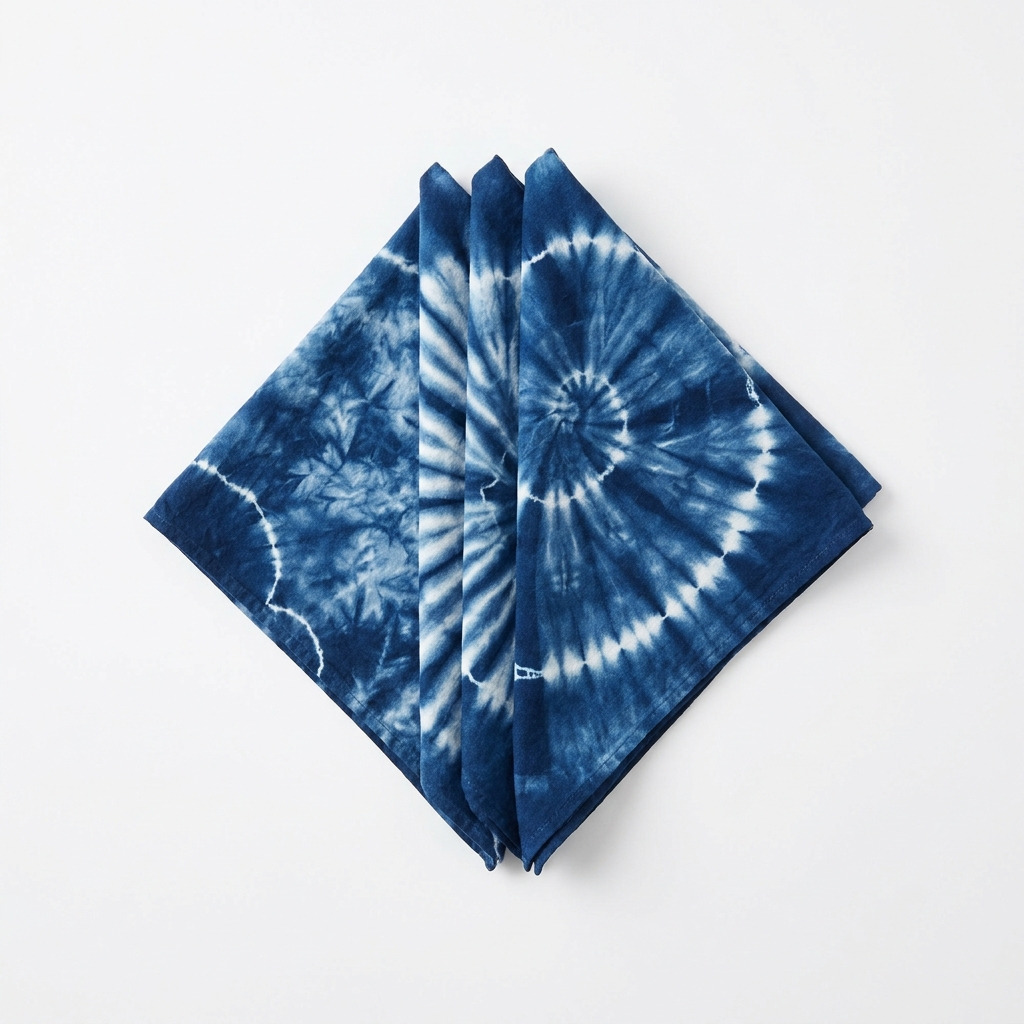
Last summer, I found myself admiring the intricate designs of Adire textiles from Nigeria. The beautiful indigo blue patterns made me want to incorporate that aesthetic into my own home. I thought, “Why not create some unique napkins that could add a cultural touch to my dining table?” Once I started folding and dyeing, I realized how fun and therapeutic the process was!
These striking napkins are not only functional but also a stunning way to express creativity. Plus, they make for a lovely conversation starter when hosting friends and family. And the best part? This project is super easy, and I’m here to walk you through it step by step!
[Image of completed indigo tie-dye napkins]
What You'll Need
Materials:
- 100% cotton fabric: 1 yard (You can choose indigo blue fabric or white fabric to dye, but the pure cotton gives the best result!)
- Indigo dye kit or powdered indigo dye: 1 kit (This is essential for achieving that deep, beautiful blue.)
- Rubber bands: 30 pieces (To secure your folds tightly.)
- Plastic drop cloth or garbage bags: 1 (This protects your workspace from any dye spills.)
- Water: Enough for dye bath and rinsing (Tap water is fine.)
- Salt: 1 cup (Needed to help set the dye if using powdered dye.)
- Optional: Gloves (These protect your hands from dye stains!)
Tools:
- Large plastic tub or bucket (5-gallon capacity): For the dye bath (Make sure it’s durable and large enough.)
- Wooden stirring stick or dowel: For stirring dye (This can be a simple old spoon or a stick.)
- Craft knife or scissors: For cutting fabric if needed (Make sure they’re sharp for clean cuts.)
- Measuring cups: To measure dye and salt.
- Ruler or measuring tape: For accurate measurements.
- Iron or fabric steamer: For smoothing the fabric before and after dyeing (An iron will give you crisp edges!)
- Safety gear: Gloves (especially for dye work) and a mask (if using powdered dye to prevent inhaling any dust).
How to Make It, Step by Step
Stage 1: Preparing the Fabric
Step 1: Cut Your Fabric
- Measure and cut the cotton fabric into four 18 inch x 18 inch squares. Use a ruler to ensure straight edges, and a craft knife or scissors to make clean cuts.
- When you’re done, you should have four square pieces of fabric, and they should all match in size.
Step 2: Pre-soak the Fabric (Optional)
- Soak your fabric in a mixture of water and a cup of salt for about 30 minutes. This helps the dye adhere better to the cotton, resulting in more vibrant colors.
- After soaking, wring out excess water — just enough to prevent dripping.
Stage 2: Folding and Tying
Step 3: Choose a Folding Technique
- You can pick from one of three methods: spiral, accordion, or crumple.
- For a spiral, pinch the center of the fabric, twist it tightly, and secure it with rubber bands radiating outwards.
- For accordion, fold your fabric back and forth like a fan, then secure at several intervals with rubber bands.
- For crumple, scrunch the fabric randomly and bind it with rubber bands, creating an organic pattern.
Step 4: Secure with Rubber Bands
- Make sure that your rubber bands are tight. This is key! If they’re loose, dye may seep under them and blur your designs. The tighter they are, the more defined the patterns.
Stage 3: Dyeing the Fabric
Step 5: Prepare the Dye Bath
- Following the instructions in your indigo dye kit, fill a large plastic tub with water (usually about 3 gallons) and add the dye. If using powdered dye, make sure to mix according to directions—this usually involves adding salt too.
Step 6: Immersing the Fabric
- Submerge the prepared fabric pieces completely in the dye bath. Let them soak for 5-10 minutes, depending on how deep you want the color to be.
- Watch closely! The fabric will begin to change color right in front of your eyes.
Step 7: Remove and Oxidize
- Take the fabric out of the dye bath and let it sit in the air for 20-30 minutes. This is when the dye oxidizes, and the vibrant indigo color will start to show.
- You’ll know it’s oxidizing because the fabric will shift from a yellowish-green back to a lovely deep blue!
Step 8: Rinse the Fabric
- Rinse each piece under cold running water. Keep rinsing until the water runs clear; this helps remove excess dye. Be patient! This step is vital for a clean finish.
Stage 4: Finishing the Napkins
Step 9: Remove the Rubber Bands
- Gently take off the rubber bands to reveal your unique dye patterns. This is my favorite part—seeing the beautiful designs come to life!
Step 10: Dry the Fabric
- Either hang your napkins or lay them flat in a shaded area to dry completely. This typically takes about 24 hours. Avoid direct sunlight, as it might fade the color.
Step 11: Ironing
- Once they are dry, iron each napkin to smooth out any creases. This also enhances the vibrancy of the dye patterns, making them look crisp and fresh!
Common Mistakes to Avoid
- Not securing rubber bands tightly. If the bands are loose, dye can seep underneath, leading to blurry patterns that you didn’t intend to create. Make them snug!
- Rushing the dyeing time. If you don’t allow the fabric to soak long enough in the dye, the color will be too light. Trust the process, and soak properly!
- Forget to rinse thoroughly. If excess dye lingers, it may come off onto your hands or table. Make sure the water runs clear before moving on.
- Skipping the drying process. Allowing the fabric to dry fully is essential. Skipping this step can lead to smudging or unexpected color combining when you iron or fold them.
Make It Your Own: Variations and Ideas
- Different colors: Try using different dyes to create a set of napkins in various hues. It’s fun to see how color can change the entire feel of your dining experience!
- Add embroidery: Once dyed and dried, consider embroidering designs or initials onto the napkins for a personalized touch.
- Bigger sizes: Want something more substantial? Cut larger squares for tablecloths or larger centerpieces.
- Combination patterns: Combine techniques! Use a spiral on one napkin and crumple on another for an eclectic set.
- Themed sets: Create a set of napkins for holidays or special occasions using seasonal colors.
I hope you enjoy making these beautifully unique napkins as much as I did. Let your creativity guide you and play with colors and patterns until you find what resonates with you!
Before You Go
Pin this for the next rainy afternoon: Save this project idea to revisit when you're ready to dive into some indigo dyeing magic. You'll have all the steps and tips right here when you're in the zone! Come back and tell me how it went: I’m excited to hear from you. No question is too small, and even if things didn’t go as planned, I want to hear all about it. Show off what you made: I can’t wait to see your finished napkins, so feel free to share!