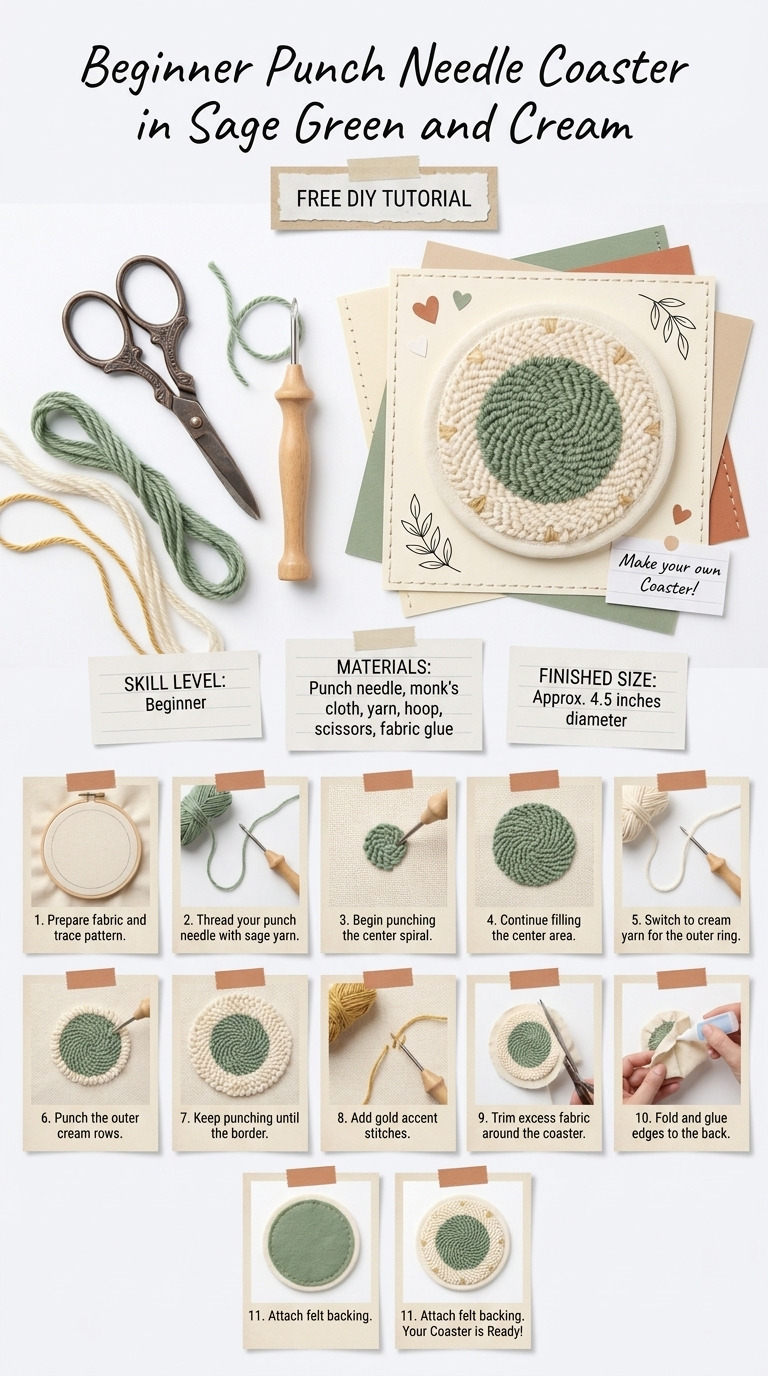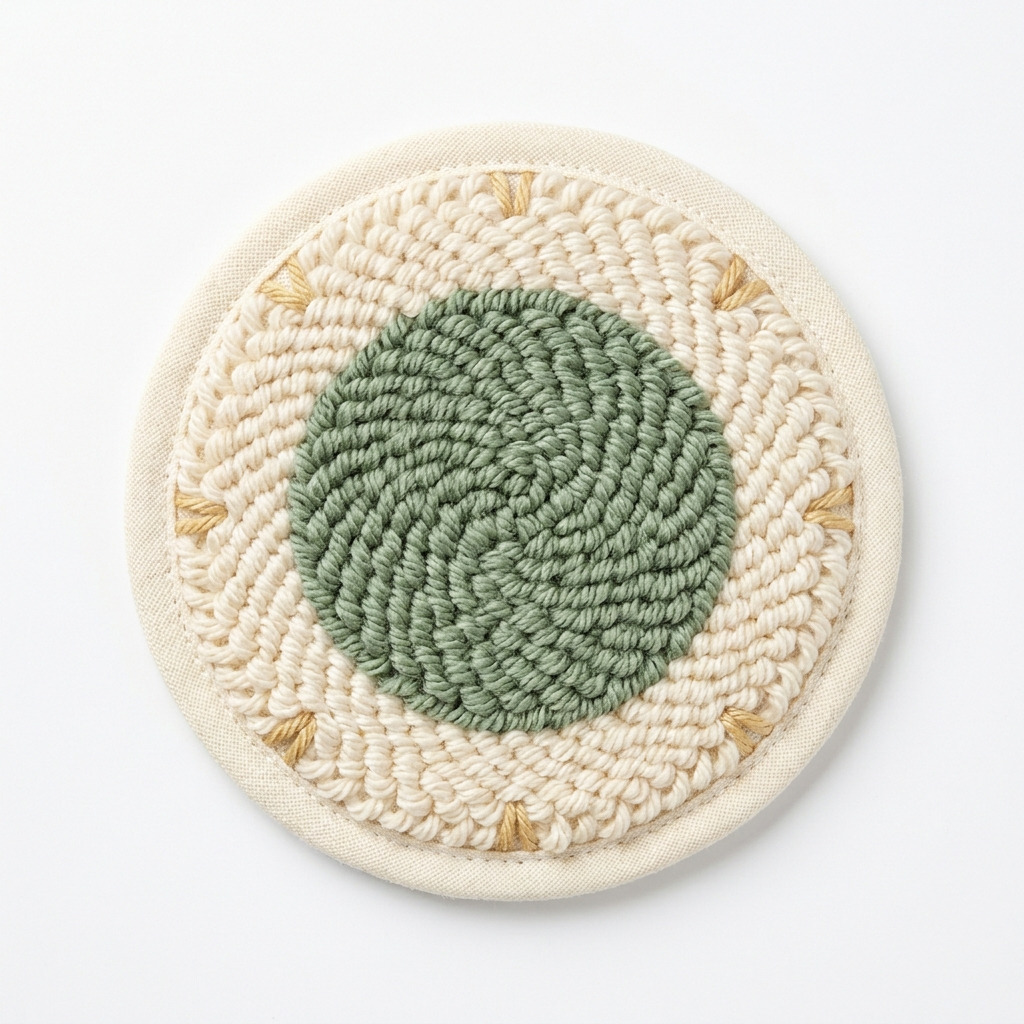
When I first saw punch needle art, I was amazed by how quickly it transformed simple fabric into something so charming and textured. I wanted to bring a bit of that beauty into my home, plus I had this pile of yarn sitting around just waiting to be used. So, I decided to create a set of coasters that would both protect my furniture and serve as lovely decor. This easy punch needle coaster in sage green and cream is not only functional but also adds that special handmade touch to your coffee table or dining setting. Trust me, this project is a breeze, and I’ll guide you step-by-step through every part of the process!
This coaster measures about 4 inches in diameter, making it the perfect size for coffee cups, glasses, or whatever you fancy. Plus, it’s a beginner-friendly project, so grab your materials and let’s get started!
[Descriptive image caption of the finished project]
What You'll Need
Materials:
- Fabric (Backing)
- 1 piece of 100% cotton fabric, 4 inches by 4 inches (cream color for a nice contrast)
- Punch Needle Thread
- 3 colors of yarn:
- 1 skein of sage green yarn (approximately 50 yards, medium weight for great texture)
- 1 skein of cream yarn (approximately 50 yards, medium weight)
- Optional: Golden beige yarn for accent (approximately 50 yards, medium weight — it adds a lovely touch if you want!)
- Punch Needle Tool
- 1 adjustable punch needle (make sure it’s suitable for medium weight yarn for best results)
- Embroidery Hoop
- 1 hoop, 6 inches in diameter (this will help keep your fabric tight and easy to work with)
- Scissors
- 1 pair of sharp fabric scissors (a good pair makes all the difference)
- Fabric Stabilizer (Optional)
- 1 small piece of lightweight stabilizer (this helps reinforce the fabric if you want a bit more durability)
Tools:
- Workspace Setup
- A flat, clean table or desk with good lighting (you’ll want to see those colors pop!)
- Surface Protection
- Cloth or cardboard to protect your work surface (keep it nice and tidy)
- Cutting
- Your fabric scissors are essential for trimming and clean edges
- Safety Equipment
- You don’t need any, but a thimble can be comfy if your fingers start to feel sore
Preparation & Setup
- Workspace Setup – Start by clearing your workspace of clutter, making sure you have room to move around. Lay down a cloth or piece of cardboard to protect your surface.
- Fabric Cutting – Cut the cream cotton fabric into a square measuring 4 inches by 4 inches. Make sure your cuts are straight for a professional look!
- Embroidery Hoop Setup – Loosen the outer ring of the embroidery hoop and place your fabric inside the inner circle. Re-tighten the ring until the fabric is taut but not too tight—you want it smooth and without wrinkles.
Step-by-Step Instructions
- Secure Fabric in Hoop – Place the 4-inch square of cream fabric inside the embroidery hoop. Tighten the hoop securely until the fabric feels taut. It should feel smooth, and there shouldn't be any puckering.
- Set Up Punch Needle Tool – Take your punch needle and thread it with the sage green yarn. Pull about 12 inches of yarn through the needle and adjust the needle depth according to your yarn weight. We’re looking for loops that stand at about 1/2 inch high.
- Punching Technique – Start from the center of the fabric. Gently punch down into the fabric and pull straight up quickly. You should see little loops forming. Create a 2-inch circle of sage green yarn. Keep punching firmly, but don’t go too deep—just enough to keep the loops intact!
- Change Colors – Now, let’s switch to the cream yarn! Punch around the sage green circle to form a 1-inch border. Continue to fill this area with loops of cream yarn, keeping those loop heights consistent like you did before.
- Optional Accent Yarn – If you’re using the golden beige yarn, this is the time to add some decorative accents! Punch small loops around the coaster, filling in gaps as you see fit. It’s a great way to add a unique touch!
- Finishing the Coaster – Once you’re happy with how it looks, carefully remove the fabric from the embroidery hoop. Trim any longer loops with your scissors to make everything look neat and tidy.
- Trimming Edges – Using your scissors, trim the backing fabric to about 1/4 inch around the punched area. If you want to be extra cautious and prevent fraying, you can sew a simple running stitch around the edge.
Assembly & Finishing
- Joining Parts
- This is a one-piece project, which means everything gets completed together while you punch—that’s the beauty of punch needle!
- Final Touches
- If you chose to use fabric stabilizer, cut a piece to match the size of your coaster and adhere it to the back using fabric glue. This adds a bit of durability, which I always appreciate!
Measurements & Dimensions
- Finished dimensions: Approximately 4 inches in diameter
- Fabric size before punching: 4 inches by 4 inches
- Diameter of the punched circle: 2 inches
Timing Information
- Estimated active working time: about 1 hour
- Drying/curing time for glue (if used): 30 minutes
- Total time: about 1.5 hours
Common Mistakes to Avoid
- Rushing to punch too deep. If you push the needle too far, it can create uneven loops. Try to keep it shallow—about a 1/2 inch should do the trick!
- Not keeping the fabric taut. If your fabric is loose, it will give you trouble while punching. Make sure it's tight in the hoop, which helps keep your work neat and manageable.
- Using inconsistent loop heights. Try to maintain those 1/2 inch heights for aesthetics! If you notice some loops are much taller, they can completely change the look. Just gently adjust them as you go.
- Pulling the yarn too tight. Keeping loops loose gives a nice, fluffy finish. If you notice your loops flattening, ease up a little while you punch.
Make It Your Own: Variations and Ideas
- Try different colors! Don't be afraid to play with your color palette — deep blues or soft pinks would also work beautifully.
- Change the shape. Experiment with different shapes like squares or even hexagons for a fun fiesta of coasters!
- Seasonal coasters. Create themed coasters for holidays! Think greens and reds for Christmas, or pastels for springtime gatherings.
- Personalized gifts. Use someone’s favorite colors to create a unique gift. Wrap it up nicely and you have a heartfelt present.
- Play with texture. Instead of just using yarn, try mixing in some fabric scraps to add a completely different feel.
Now that you have all the steps and ideas, the joy is in your hands! Remember, there’s no right or wrong way to express yourself creatively. Have fun with it!
Before You Go
Pin this for the next rainy afternoon: Save this project so you’ll have all the details handy for when you’re ready to make your own beautiful punch needle coasters!
Come back and tell me how it went: I’m always here for your questions, no matter how basic—they’re all welcome! And if your project didn’t go exactly as you’d hoped, don’t worry; I’d love to hear about that, too.
Show off what you made: I can’t wait to see your finished coasters!