Anyone who has ever owned a dog knows just how quickly they can go through toys. I’ll never forget the heartbreak of watching my pup destroy an expensive chew toy in less than a day. That’s when I decided to get crafty and make my own durable dog toys using materials I already had lying around the house. One of my favorites is a rope dog toy made entirely from old t-shirts. Not only is it a fun project, but it’s an excellent way to recycle old clothing into something useful — plus it’s safe for your pet!
The beauty of this project is its simplicity. You don’t need fancy tools or materials — just some old t-shirts and scissors! The finished toy is about 12 inches long and has a thick braided section that’s about 8 inches. I keep one of these by my dog’s favorite spot, and he loves to tug and chew on it. I promise you can do this too, and I’ll walk you through every single step!
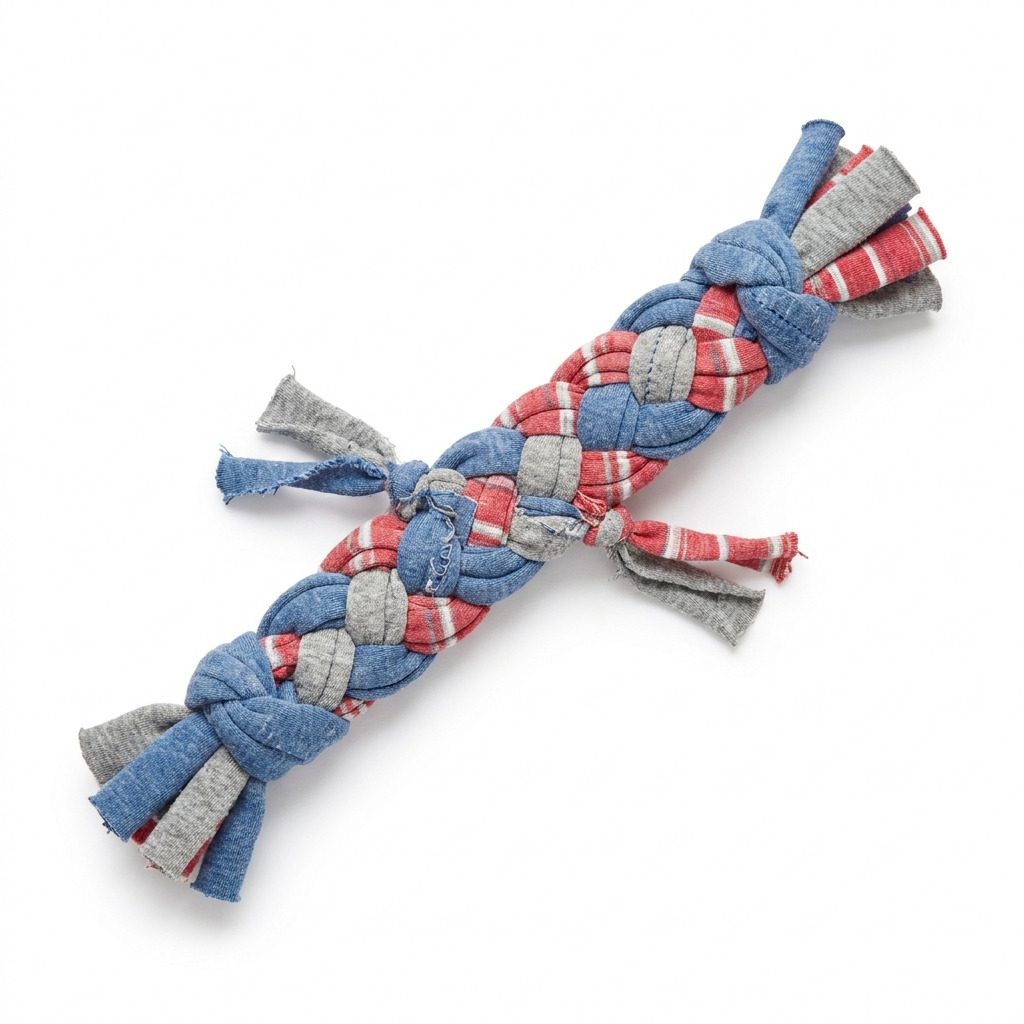
[Descriptive image caption of the finished project]
What You'll Need
Materials:
- Old t-shirts: 3 shirts, preferably cotton (any color or pattern works! I love bright colors).
- Optional: Fabric glue (for extra strength; it helps keep the strips from fraying).
Tools:
- Scissors: 1 pair, standard size (make sure they’re sharp for clean cuts).
- Cutting mat: to protect your surfaces while cutting (a thick piece of cardboard works too if you don’t have one).
- Ruler: 12 inches long for measuring fabric strips (you can just use a measuring tape if you don’t have a ruler).
- Safety gear: None required, but I like to wear eye protection when using scissors, just to be on the safe side.
How to Make It, Step by Step
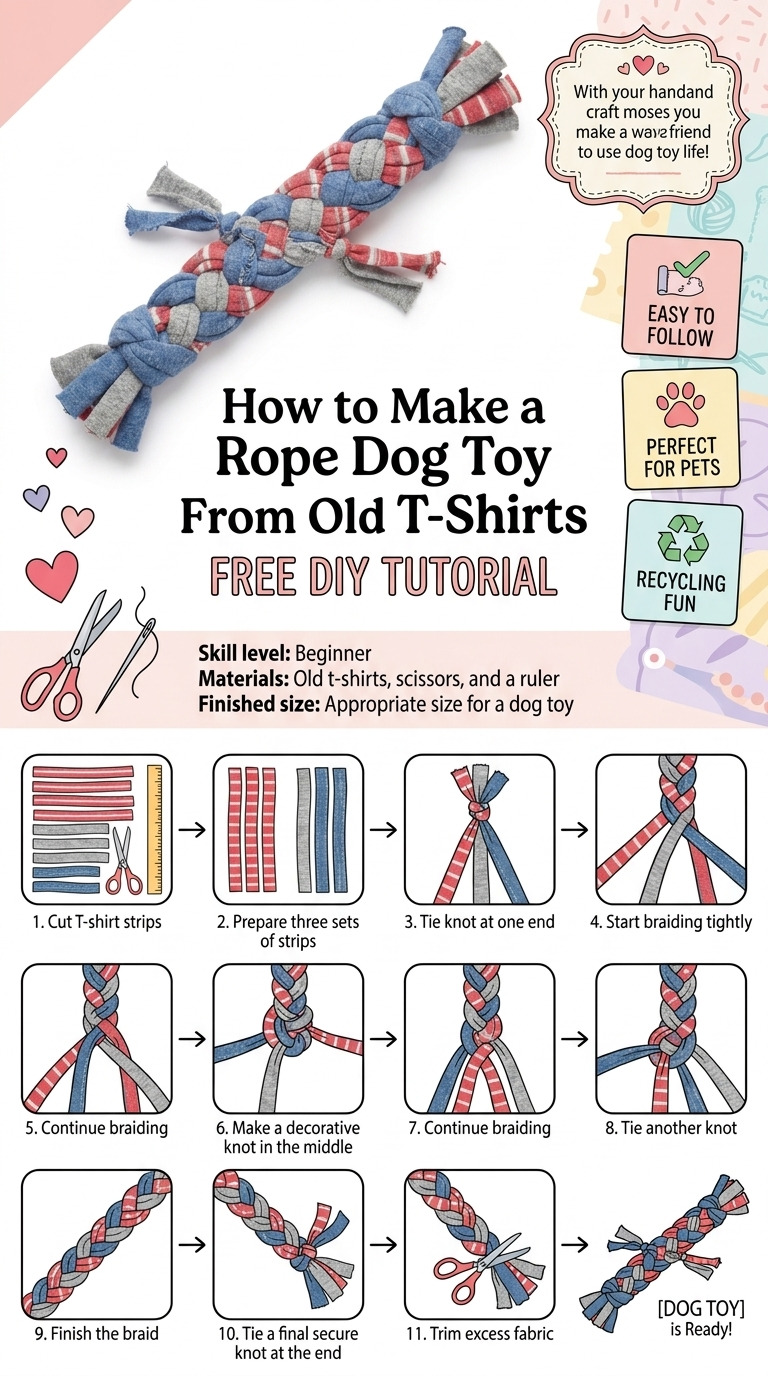
Step 1: Cut the T-Shirts
Take your first t-shirt and lay it flat on your cutting mat. Using your scissors, cut the t-shirt into strips that are 1 inch wide and 12 inches long. You will need 4 strips from each shirt, so that means you’ll make 12 strips total after cutting from all three shirts.
Tip: If you're cutting multiple shirts, stack them neatly and cut through several at once to save time!
Step 2: Gather the Strips
Once you have all 12 strips cut, gather them together. Make sure they are roughly equal in length for a tidy braid. For added durability, take a moment to apply a dot of fabric glue to the ends of each strip if you decide to use it. This will help prevent fraying as your dog plays with the toy.
Step 3: Braid the Strips
Now we get to the fun part — braiding! Take three of the strips and tie a knot at one end. Make sure this knot is tight and secure; this will be the starting point of your braid. Next, start braiding by crossing the right strip over the middle strip, then crossing the left strip over the new middle strip.
Repeat this pattern until you’ve braided down to the end of the strips. You should have about an 8-inch long braided section when you finish.
Tip: If you find your strips slipping around or tangling, just give them a little twist to keep them in place as you go!
Step 4: Finish the Toy
Once you've reached the end of your braid, tie another knot to secure it. If you have any excess fabric sticking out below the knot, just trim it a little to give it a neat appearance. Voilà! Your rope dog toy is ready to be played with.
Assembly & Finishing
Assembling this toy is really just braiding the strips together, so that part is pretty straightforward. If you're feeling a little extra creative, you can add texture by tying some smaller pieces of decorative fabric or old t-shirt scraps into the braid in various spots.
Measurements & Dimensions
The finished dimensions of your toy will be approximately 12 inches long and 2 inches wide. Each strip from the t-shirts was cut to 1 inch by 12 inches, and the braided section will end up being around 8 inches long when finished.
Timing Information
- Estimated active working time: 30 minutes
- Drying time (if you're using fabric glue): about 30 minutes
- Total time for this project: around 1 hour
Common Mistakes to Avoid
- Cutting strips that are too short. This can leave you with a toy that isn’t effective for braiding. Double-check your measurements to ensure each strip is 12 inches long.
- Not tying the knots tightly enough. If your knots aren’t snug, the whole toy can unravel. Give those knots a good tug to secure them!
- Using t-shirts with embellishments. Heavy graphics can make the fabric stiff, which might lead to a less flexible and fun toy. Stick with plain or simple patterned shirts for the best results.
- Skipping the glue on the ends. I once made a toy without gluing the ends, and it started fraying almost immediately. If you’re using fabric glue, don't skip this step!
Make It Your Own: Variations and Ideas
- Colorful Creations: Use t-shirts of various colors to create a vibrant, multi-colored rope toy that’s visually appealing.
- Layered Textures: Try braiding in different fabric scraps or even old pillowcases to add variety in texture and feel.
- Gift Idea: Make a set of these toys to give as a gift to a friend with a dog. Imagine how happy they’d be to get a cute, handmade toy!
- Larger Size: If you’re making this for a big dog, simply cut longer strips or use more shirts to make a bigger toy.
I’m so excited for you to take on this project! Crafting this rope dog toy from old t-shirts is not only a fun way to recycle but also gives your furry friend something safe and enjoyable to play with.
Before You Go
Pin this for the next rainy afternoon: Save this project for when you have some old t-shirts on hand and the time to make a sturdy, reusable dog toy! You’ll want to refer back to the steps and measurements. Come back and tell me how it went: I would love to hear about your adventures in crafting this toy. No question is too small, and even if the project didn’t go perfectly, please share your experiences! Show off what you made: I can’t wait to see what you come up with, so don’t hesitate to share the finished toy with others! Enjoy your crafting time!