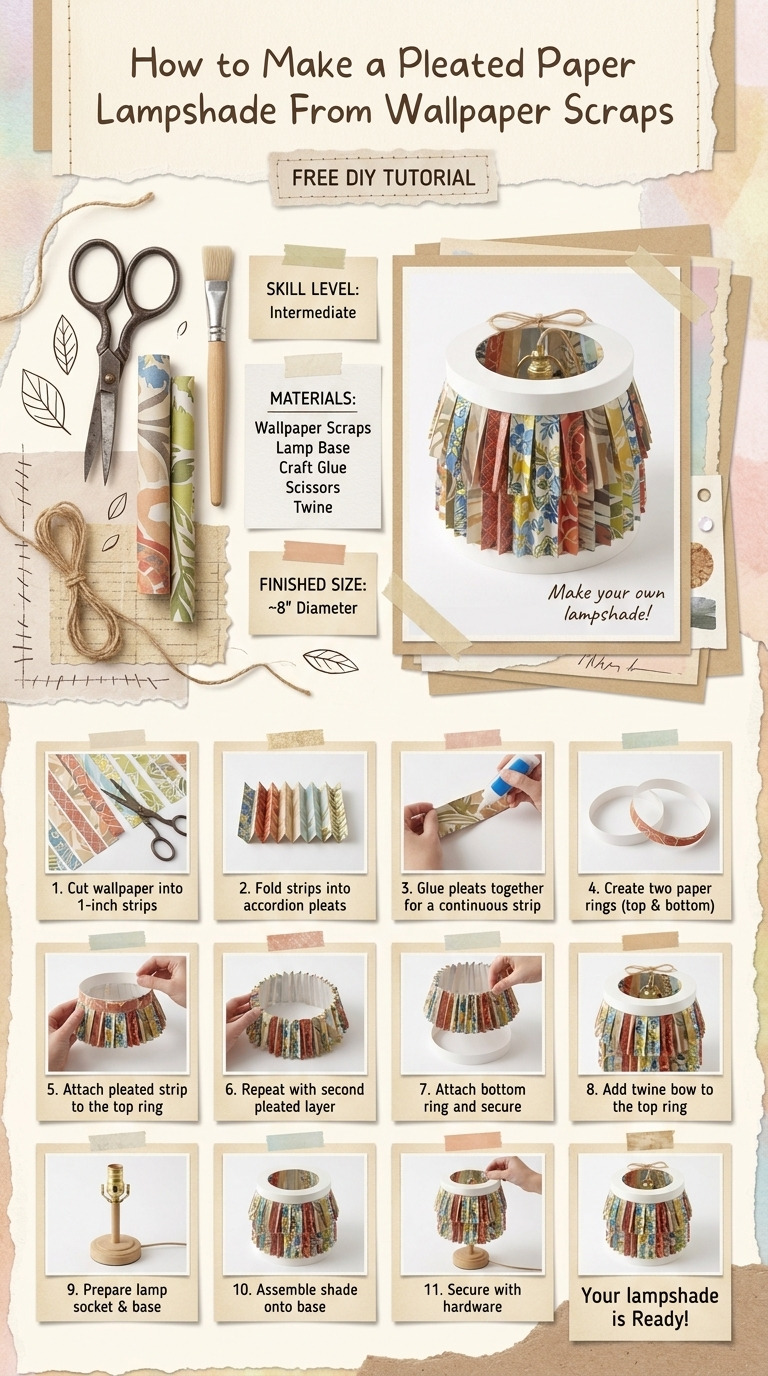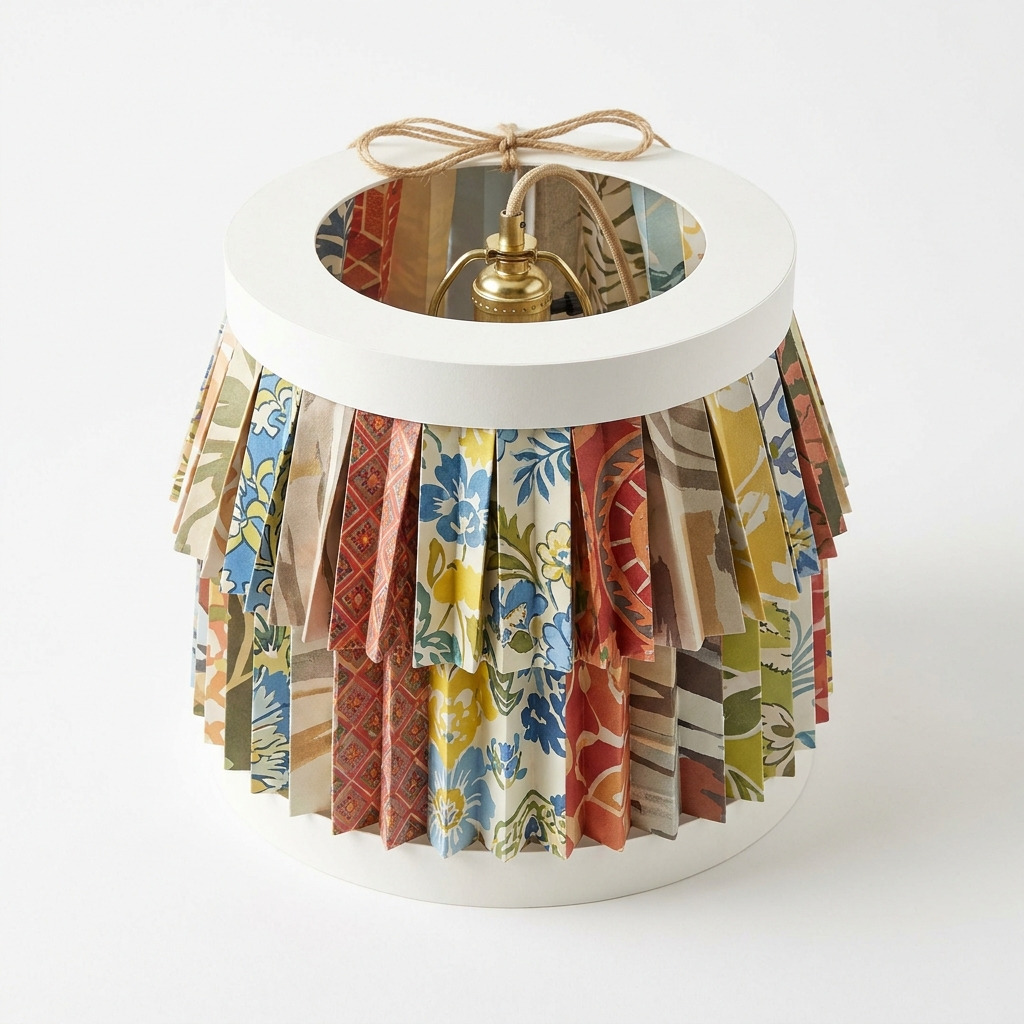
Once, I found myself staring at a plain old lamp sitting in the corner of my living room. It worked perfectly, but it lacked that special touch. Then I had a lightbulb moment (pun intended!) — why not jazz it up with one of those stunning pleated lampshades I’d seen but didn’t want to splurge on? I decided to dive into my craft stash and uncovered some colorful wallpaper scraps I had saved from my last home project. That’s how I ended up creating this beautiful pleated lampshade, which now brightens up my room with style and personality.
The best part? This DIY project is super easy to tackle, and I’ll be here with you every step of the way. Once you have your materials ready, you’ll find that making a pleated lampshade from wallpaper scraps is both fun and satisfying. Let’s get crafting!
[Descriptive image caption of the finished project]
What You'll Need
Materials:
- Wallpaper scraps: 2-3 pieces, each measuring at least 20 inches x 30 inches (Pick any color or pattern that speaks to you; go wild!)
- Heavyweight cardstock: 2 pieces, each measuring 12 inches in diameter (This lends structure to your lampshade.)
- Strong craft glue or double-sided adhesive tape (These will keep everything secure.)
- Ribbon or twine (for hanging, optional): about 24 inches (Adds a charming touch if you want a hanging lampshade.)
- Parchment paper: 1 sheet, cut to 5 inches x 30 inches (We’ll use this for the pleats.)
Tools:
- Craft knife or scissors (To cut your materials.)
- Cutting mat (Protects your workspace and gives you a good surface for cutting.)
- Ruler (12-inch) (To measure your cuts precisely.)
- Pencil (For marking measurements.)
- Hot glue gun and glue sticks (Perfect for strong, quick adhesion.)
- Bone folder or scoring tool (For creating clean creases in the pleats.)
- Safety equipment: Gloves (Wear these when using the hot glue to protect your hands.)
Now, if you don’t have parchment paper, you can use any sturdy paper — old wrapping paper or even a cereal box can work in a pinch! Just make sure it holds its shape well.
How to Make It, Step by Step
Step 1: Prepare the Top and Bottom Rings
- Start by cutting out two circles from your heavyweight cardstock, each measuring 12 inches in diameter. Use the ruler to mark the circles and carefully cut them with your craft knife.
- Next, find the center of each circle and mark a smaller circle with a diameter of 2 inches. This opening will allow the light fixture to fit through later.
- Use the craft knife to carefully cut out the smaller circle on both cardstock rings. Your two rings will look a bit like giant donuts!
Step 2: Creating the Pleats
- Take your wallpaper scraps and cut them into strips measuring about 4 inches wide by 12 to 18 inches long. You can adjust the length depending on the size of pleat you want!
- Using the bone folder or scoring tool, create creases every 1 inch along the length of each strip. This is where the magic happens — these folds will give your shade the beautiful pleated effect!
Step 3: Assemble the Pleats to the Bottom Ring
- Grab a pleated strip and place it against the outer edge of the bottom cardstock ring. Use your hot glue gun to adhere the base of the pleated wallpaper to the ring.
- Hold the strip in place for a few seconds to let the glue set. Continue adding pleats around the ring, overlapping them slightly for added fullness.
- As you go, keep focused on ensuring the pleats are consistent and symmetrical. Trust me, takes your time here — it’ll really make a difference!
Step 4: Attach the Top Ring
- Once all your pleated strips are securely adhered to the bottom ring, carefully flip the ring upside-down.
- Apply hot glue to the top ends of each pleated strip. Make sure they align properly for a neat finish.
- Place the top cardstock ring onto the pleated strips, pressing gently to secure everything in place. Hold it for a few moments — this step is crucial for keeping your shade sturdy.
Step 5: Add the Hanging Mechanism
- If you want to hang your lampshade, cut your ribbon or twine to about 24 inches. Attach it to the top ring, tying securely. You may want to glue it down with a little bit of hot glue for extra security.
Step 6: Install Light Fixture
- Give your project at least 30 minutes of drying time to ensure everything is firm before you handle it too much.
- Now, fit the light bulb socket through the opening in the top ring. Follow the manufacturer's instructions to make the necessary electrical connections to get your lampshade glowing!
Common Mistakes to Avoid
- Rushing the drying process. If you don’t let the glue set properly, the pleats might come loose. Always give it a good half hour!
- Cutting uneven strips. If your wallpaper strips aren’t consistent, the pleats won’t look uniform. Measure twice, cut once!
- Not placing pleats symmetrically. If they’re off-balance, it can make the shade look wonky. Just keep checking as you go.
- Forgetting to score the pleats. If you skip this step, your pleats won’t fold nicely. Take your time to score each one!
- Using too little glue. This can lead to loose parts later. Make sure you apply enough, but don’t go overboard!
Make It Your Own: Variations and Ideas
- Play with colors: Use a mix of different wallpaper patterns for a more eclectic look.
- Adjust pleat size: Experiment with wider or narrower pleats — wider pleats give a bolder look!
- Go for fabric: Try using leftover fabric remnants instead of wallpaper for a softer, cozy vibe.
- Seasonal themes: Create different shades for holidays or seasons — think warm colors for fall or icy pastels for winter!
You’ve got the creative freedom to make this lampshade truly your own. It’s all about what brings you joy in your space!
Before You Go
Pin this for the next rainy afternoon: Save this post to your Pinterest board so you can find your step-by-step guide for making a stunning pleated lampshade when the crafting mood strikes and you have your materials ready!
Come back and tell me how it went: I’d love to hear how your project turned out! No question is too basic, and sharing about times when things went a little sideways is just as welcome as your successes.
Show off what you made: Feel free to share your beautiful lampshade with pride once you’re done. Happy crafting!