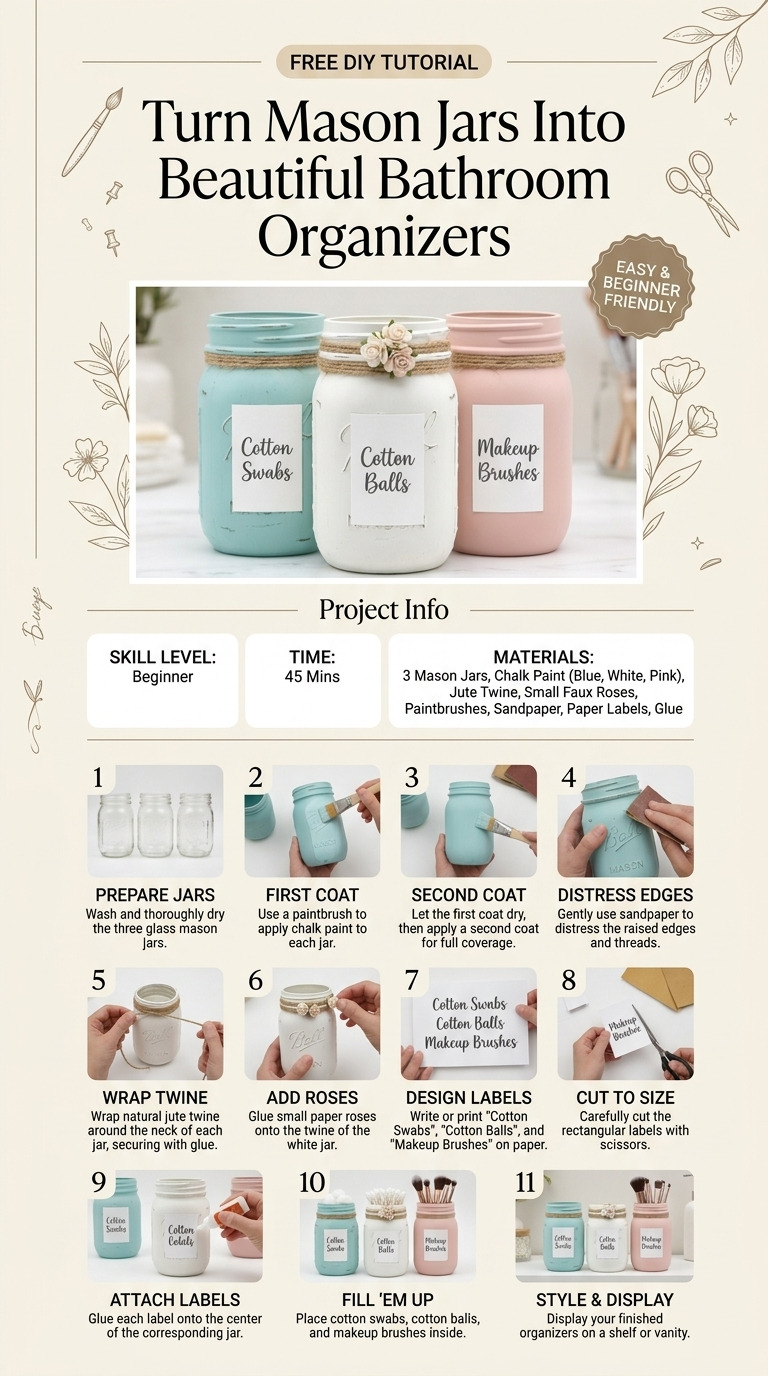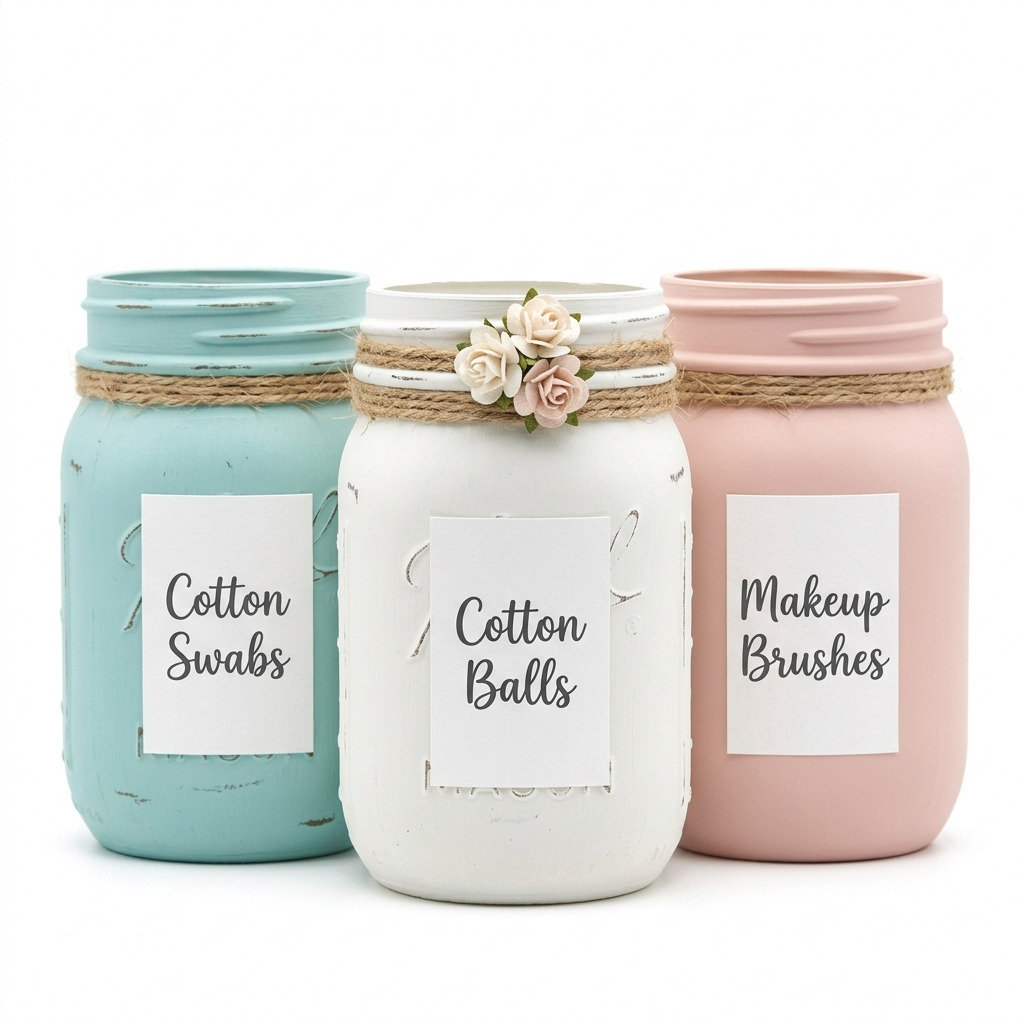
Last winter, I found myself staring at a cluttered bathroom countertop overflowing with cotton swabs, makeup brushes, and various little items that seemed to have no place. I wanted something that not only kept everything organized but also added a touch of charm to my space. That’s when I had the idea to transform good old mason jars into beautiful bathroom organizers! They can hold everything from cotton balls to hair ties while giving a rustic and elegant vibe that fits right into my home.
This project is incredibly easy and requires minimal skills — perfect for anyone, whether you’ve crafted before or are just getting started. I’ll walk you through every step, so you’ll feel confident making your own delightful bathroom organizers.
[Descriptive image caption of the finished project]
What You'll Need
Materials:
- Mason Jars: 3 standard pint-sized mason jars (16 oz capacity) with a regular mouth. Use recycled jars from your kitchen if you have them!
- Paint: Chalk paint in 3 colors (e.g., soft white, light teal, blush pink) — you’ll need 1 small bottle (approximately 8 oz) per color. Feel free to experiment with any colors that match your décor.
- Sandpaper: 220-grit for distressing (optional, adds a weathered look).
- Rope/Baker's Twine: 1 roll, about 5 yards (use natural jute or colored cotton for a decorative touch).
- Labels: White cardstock or pre-made chalkboard labels. You can even use old scrapbook paper!
- Adhesive: Mod Podge or clear-drying craft glue to attach labels.
- Clear Sealer: Acrylic sealer spray (optional, provides protection from water).
- Embellishments: Optional additions like faux flowers, small shells, or decorative stones to personalize your jars.
Tools:
- Craft Brush: 1 wide brush (1-2 inches wide) for painting those jars.
- Detail Paintbrush: To sneak in touch-ups (size 00 works well).
- Hot Glue Gun: With glue sticks for secure attachment of twine and embellishments.
- Scissors: For cutting twine and labels.
- Ruler: To measure label placements accurately.
- Pencil: For marking places where you’ll put your labels.
- Safety Equipment: Optional work gloves if you’re sensitive to paint or glue.
How to Make It, Step by Step
Stage 1: Painting the Mason Jars
Step 1: Prepare Paint
Shake the chalk paint bottles well before you dive into painting. This helps mix the paint thoroughly so you get an even shade.
Step 2: First Coat
Using the wide craft brush, start painting the outside of one mason jar. Begin at the top and work your way down, making sure to keep your paint application nice and even. Avoid painting the rim or inside of the jar. Let it dry completely for about 1-2 hours.
Step 3: Additional Coats
Once the first coat is dry, go ahead and apply a second coat. This helps achieve full coverage. If you want an even bolder look, consider a third coat after the second has dried.
Step 4: Distressing (Optional)
If you’re going for a rustic look, take the 220-grit sandpaper and lightly sand areas where you want to distress—focus on corners and edges. This will reveal some of the glass underneath and add character.
Stage 2: Adding Labels and Twine
Step 5: Label Preparation
If you're using cardstock, cut it into label-sized pieces measuring 2 inches by 3 inches. You can either write or print your desired labels like "Cotton Balls," "Cotton Swabs," and "Makeup Brushes." Creativity is your friend here!
Step 6: Attach Labels
Center each label on the corresponding jar. Use Mod Podge or craft glue to stick them on, and let them dry completely. Take your time to make sure they’re nice and straight; it makes a big difference!
Step 7: Wrap Twine
Cut a length of twine around 20 inches long. Wrap the twine around the jar just below the rim, making 2-3 complete turns. Secure the end with a dot of hot glue to keep it in place.
Stage 3: Final Touches
Step 8: Adding Embellishments (Optional)
For a little flair, use a dab of hot glue to attach small faux flowers or decorative stones along the twine or around the top of the jar.
Step 9: Seal (Optional)
If you want your jars to last longer, spray them with a clear acrylic sealer once everything is dry. Make sure to let it dry fully following package instructions; this protects your paint and embellishments!
Common Mistakes to Avoid
- Skipping the Drying Time: Ensure each coat of paint has dried completely. Rushing this can lead to peeling or streaks.
- Applying Labels Too Soon: Let the paint dry before sticking the labels on. Wet paint can cause the labels to bubble or peel.
- Painting Inside the Jars: That’s not where you want paint! Keep the rim and inside clear to avoid mishaps when you fill them.
- Not Checking Even Coverage: After each coat, ensure the coverage is even to avoid streaks. A second coat can help fix any thin spots.
- Over-sanding: If you do distress the jars, take it slow. Over-sanding can leave them looking worn instead of charming.
Make It Your Own: Variations and Ideas
- Color Palette Switch-Up: Use vibrant colors like red or royal blue for a fun pop that brightens up the bathroom.
- Customize Labels: Get creative with your labels! Try hand-lettering them or using different fonts for a more personalized touch.
- Size Variations: If you have larger or smaller jars, feel free to adjust your designs! Larger jars can be great for washcloths or bigger items.
- Seasonal Themes: Create seasonal organizers! For autumn, use orange and brown; for winter, think blue and white with holiday labels.
- Personal Gifts: These jars can be excellent gifts! Fill them with goodies like bath bombs or handmade soaps for a thoughtful touch.
I hope you feel inspired to give this project a try! It’s fun, useful, and a lovely way to add a personal touch to your bathroom or any space.
Before You Go
Pin this for the next rainy afternoon: Don’t forget to save this post so you can revisit the instructions and measurements when you’re ready to create your beautiful mason jar organizers!
Come back and tell me how it went: I would love to hear how your jars turned out! No question is too basic, so feel free to ask if anything went sideways.
Show off what you made: If you’re excited to share your finished project, I’m here for it — let’s celebrate your creativity!