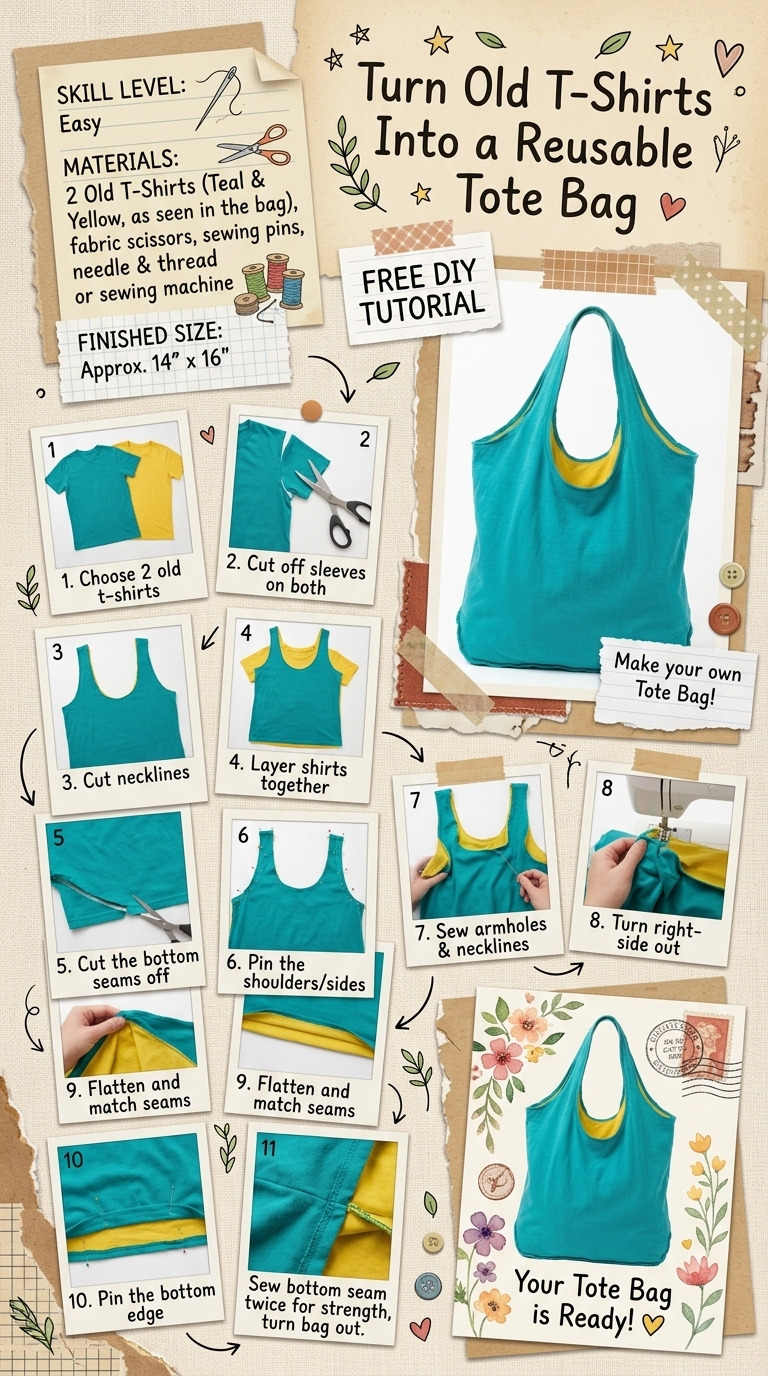
Do you have a pile of old t-shirts just sitting in your closet? I sure did! They were bright colors and fun patterns, but I never wore them anymore. Instead of tossing them in the trash, I decided to turn them into something useful. That's how I came up with the idea of making a reusable tote bag. It's a fantastic way to carry groceries, books, or any personal items, and it's environmentally friendly too! Plus, it feels good to repurpose something that might otherwise go to waste.
This project is super easy, and I promise you can do it even if you've never sewn a thing in your life. I'll walk you through each step as we transform these old tees into a stylish and functional tote. Let’s get crafting!
[Placeholder for an image of the finished tote bag]
What You'll Need
Materials:
- Old T-shirts: 2 t-shirts in cotton or cotton blend, size Large or larger (pick fun colors or patterns you like)
- Thread: 1 spool of matching thread (choose a color that matches your t-shirts)
- Fabric marker or chalk: 1 for marking your measurements
Tools:
- Scissors: 1 pair of sharp scissors
- Sewing needle: 1 heavy-duty needle (if you’re hand sewing)
- Sewing machine: (optional) if you want to speed things up a bit
- Measuring tape: 1 for accurate measurements
- Pins: (optional) to hold fabric in place while sewing
- Ruler or straight edge: for marking straight lines
- Iron: (optional) for pressing hems
- Safety equipment: eyewear protection if you’re using sharp scissors
Step-by-Step Instructions
Preparing the T-Shirts
Step 1: Select Your T-Shirts
Choose two old t-shirts: one will be the main body for your bag, and the second one can either reinforce the bag or be used for additional stylish designs.
Step 2: Cut Off the Sleeves
Grab your scissors and cut off both sleeves of the first t-shirt. Be sure to cut closely to the body seam where the sleeves connect. This will give you a nice clean edge.
Step 3: Cut the Neckline
Next, cut around the neckline in a U-shape. Aim for a depth of about 4-5 inches down into the shirt; this will be the opening of your tote bag. Take your time to make it as symmetrical as you can!
Step 4: Make the Bottom Closure
Now it’s time to flip the t-shirt inside out. Using your fabric marker, mark a straight line about 3 inches from the bottom of the shirt. This will be your stitching line when we close off the bottom.
Step 5: Cut the Bottom Hem
Using your scissors, cut a semi-circle across the bottom of the t-shirt about 1-2 inches above the stitching line marked in Step 4. This creates a gusset, which will help your tote hold more stuff.
Assembling the Bag
Step 6: Prepare for Sewing
Fold the bottom hem of the shirt up towards the inside to create a clean edge. If you're using a sewing machine, make about a quarter-inch fold. If you have them, you can pin the fabric in place to prevent it from moving around.
Step 7: Sew the Bottom
Now, it's time to sew! Whether you’re using a sewing machine or hand sewing, go along the edge marked in Step 4 to close off the bottom. I recommend a straight stitch here, and don’t forget to backstitch at the start and end to secure your seams—trust me, it makes a difference!
Step 8: Create the Gusset
To give your bag depth, pinch the corners of the bottom shut and sew across each corner, about 2 to 3 inches in from the tip. This creates a triangle shape and shapes your bag beautifully.
Finalizing the Tote Bag
Step 9: Turn the Bag
Carefully turn your bag right side out. Voila! You should see a lovely tote bag shape with a wide U-shaped opening.
Step 10: Reinforce if Desired
If you want extra durability, take your second t-shirt and cut it down to a rectangle about the same size as the bag’s front (15 inches x 16 inches). Sew this onto the inside of the tote for added strength.
Assembly & Finishing
Take a moment to check that all seams are secure and trim any loose threads. If you feel up to it, give the seams a little press with an iron on low heat to make everything look crisp and neat (this is optional but really helps!).
Common Mistakes to Avoid
- Rushing the glue. If you’re not properly securing your seams, they could rip easily. Remember to backstitch when sewing to make sure everything holds.
- Cutting the neckline too wide or too small. If you find your opening is too tight, you can always re-cut to make it wider, but it’s best to measure carefully first!
- Not measuring the gusset cut correctly. A poorly cut bottom can lead to a bag that doesn’t hold its shape. Take your time to ensure those cuts are right.
- Ignoring fabric type. Not all fabrics are created equal! Stiff materials may not work well for this project, so stick with soft cottons and blends.
Make It Your Own: Variations and Ideas
- Patchwork Design: Use multiple old t-shirts to create a patchwork effect for a colorful look.
- Add Embellishments: How about some fabric paint or stitched designs? Get creative and personalize your tote.
- Different Sizes: Feel free to adjust the dimensions to make a smaller purse or a larger beach bag.
- Seasonal Patterns: Use holiday-themed t-shirts for festive tote bags or summer patterns for a beachy vibe.
This DIY project opens up a world of creative possibilities, and I can’t wait for you to make this tote bag your own!
Before You Go
Pin this for the next rainy afternoon: Save this post so you can reference these measurements and steps when you’re ready to craft your own reusable tote bag from old t-shirts.
Come back and tell me how it went: I want to hear all about your project! No question is too basic, and if things didn’t go perfectly the first time, I’d love to know about it too.
Show off what you made: Don’t keep that lovely tote to yourself! Share your finished project with me; I’d be thrilled to see what you created. Happy crafting!