When I first decorated my living room, I wanted something unique to add a touch of warmth and style. I stumbled upon some beautiful concrete candle holders online, and I thought, "I bet I could make that!" The idea of bringing a modern, minimalist vibe into my space was so appealing—especially since I could create it for a fraction of the price of store-bought versions. I adore the subtle gray of concrete combined with cascading candlelight for a cozy atmosphere.
This DIY concrete candle holder has become a staple in my home. I keep it on my coffee table, and it draws all the right compliments! Best of all, this project is easy to tackle, even if you’ve never dabbled in crafting before. I’ll walk you through every step, so you can create your very own stylish holder.
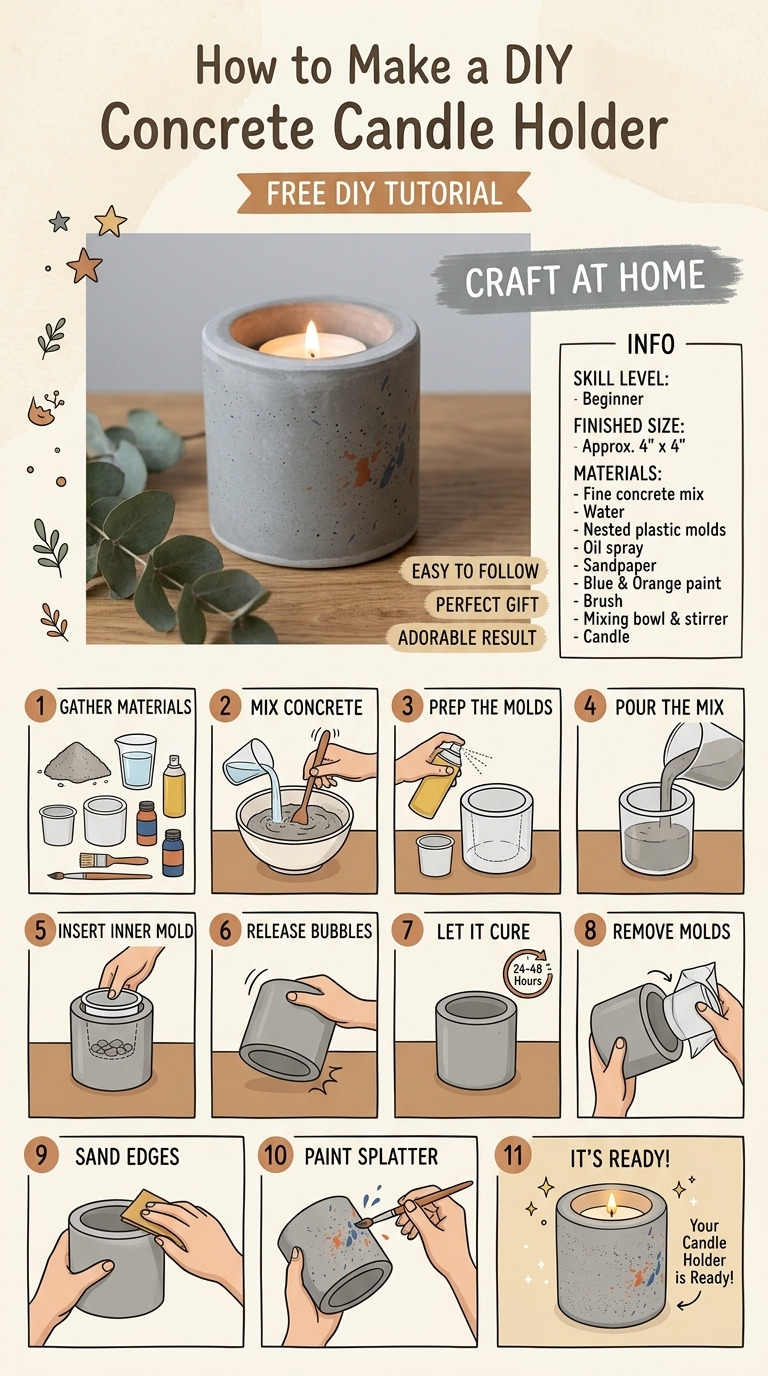
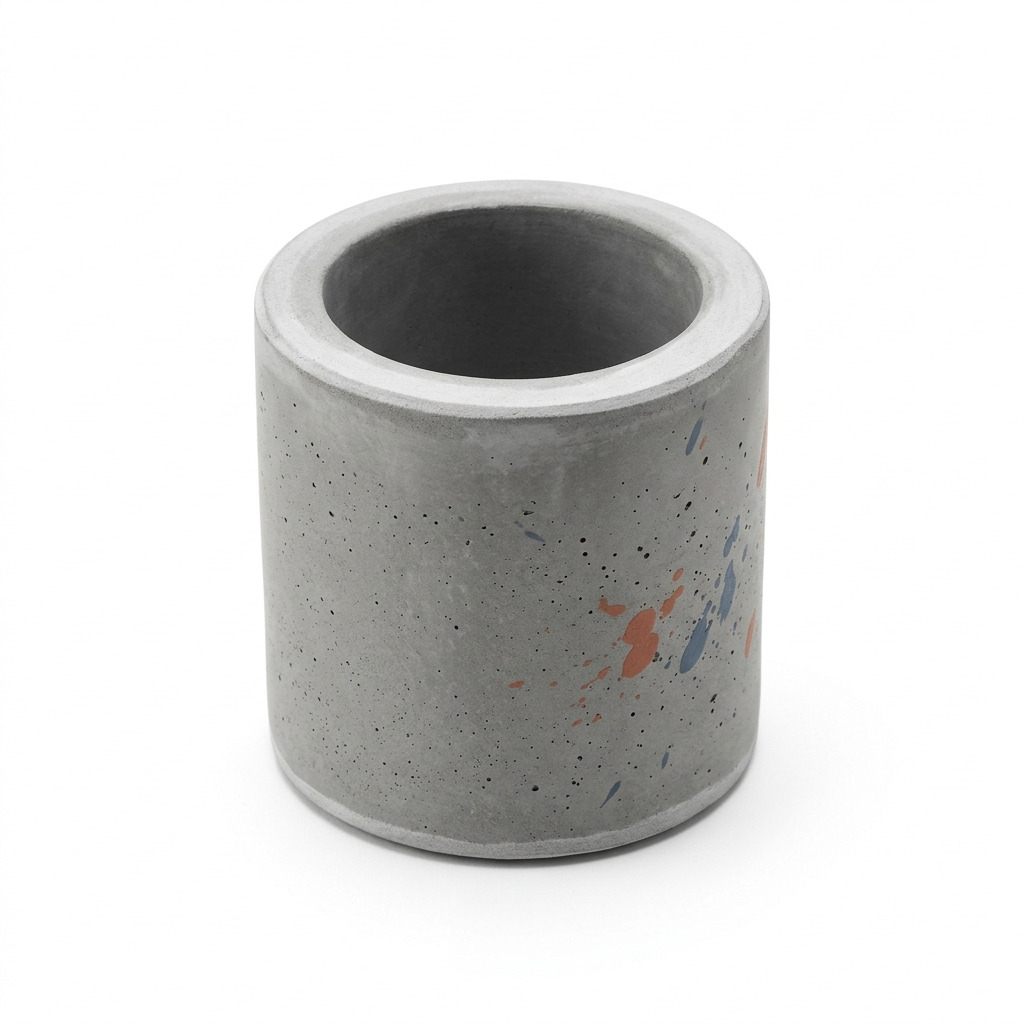
[Descriptive image caption of the finished project]
What You'll Need
Materials:
- Concrete mix: 1 bag (approximately 4 lbs) of quick-setting concrete mix (such as Quikrete) — This gives you a sturdy hold and is easy to work with.
- Water: Enough to mix with the concrete (about 1-2 cups, depending on the mix) — Follow the package instructions for the right amount.
- Plastic mold: 1 round container (4 inches in diameter) for the outer mold and a smaller plastic cup (3 inches in diameter) for the inner mold — You can use any sturdy plastic containers that will fit without breaking.
- Cooking oil or vegetable spray: For lubricating the molds — This simple step makes demolding easier and prevents sticking.
- Sandpaper: 120 grit to smooth edges — This will help make your candle holder look polished and professional.
- Paint (optional): Acrylic paint in your choice of color — Use this to customize the appearance of your holder.
- Sealant (optional): Concrete sealer or matte acrylic spray — This adds a protective finish and keeps your holder looking fresh.
Tools:
- Mixing container: For combining concrete and water — A simple bucket or large mixing bowl works well.
- Stir stick: To mix the concrete thoroughly — You could use a wooden stick or even a paint stirrer.
- Trowel or spatula: For spreading concrete inside the molds — A kitchen spatula works fine if you don’t have a trowel.
- Clamps: To secure the molds if needed — These can help hold your molds in place if they’re a bit flimsy.
- Cutting mat: To protect your work surface — This keeps everything tidy and easy to clean up.
- Safety equipment: Dust mask while mixing concrete, and gloves to protect your hands — Safety first! Concrete dust can be irritating, and it's always good to keep your hands clean.
How to Make It, Step by Step
Step 1: Mix Concrete
Start by pouring the concrete mix into your mixing container. Measure out about 1-2 cups of water and gradually add it to your concrete mix. Use a stir stick to mix it all together until you achieve a thick, peanut butter-like consistency. It usually takes about 3-5 minutes to get it just right. Tip: If your mixture is too runny, it will lose its shape. If it's too thick, it can be hard to pour. Aim for a good thick paste!
Step 2: Pour Concrete into Outer Mold
Take half of your mixed concrete and pour it into the round outer mold. Use the trowel to spread the concrete evenly along the sides, aiming for about 2 inches high. Make sure it’s level around the entire circumference. This will form the base of your candle holder.
Step 3: Insert Inner Mold
Carefully take your smaller plastic cup and place it in the center of the outer mold. Gently press it down to ensure it's centered and sits evenly without pushing too deep. It will create the cavity for your candle. Adjust it until you feel confident that everything looks balanced.
Step 4: Fill the Outer Mold
Now, take the remaining concrete mix and pour it around the smaller cup, filling the outer mold to the top. This encapsulates the smaller cup within the concrete. Gently tap the sides of the outer mold to release any trapped air bubbles, ensuring the concrete settles well.
Step 5: Curing Time
Let your concrete cure undisturbed for 24 to 48 hours. Check the manufacturer’s instructions for the exact curing time, as this can vary by product. This step is crucial—skipping it may result in a weak holder.
Step 6: Demolding
Once your concrete is fully cured, it’s time to remove the molds. Start with the outer mold; gently pull it off. If it’s hard to get off, you can cut the mold if needed. After that, pull out the smaller inner cup to reveal the newly formed cavity.
Step 7: Sanding the Edges
Using the 120 grit sandpaper, gently smooth out any rough or jagged edges at the top and the bottom of your candle holder. Make sure the edges feel smooth to the touch. You might want to run your fingers along them to check.
Step 8: Finishing Touches (Optional)
If you feel creative, now's the time to paint the outside of your candle holder with acrylic paint. Allow it to dry for about 30 minutes. If you choose to paint, you might want to apply a coat of sealant afterward to protect your finish, but this step is entirely optional. Let it dry according to the sealer instructions for best results.
Common Mistakes to Avoid
- Over-mixing the concrete. This can weaken the structure, leading to cracks. Whip it just enough to combine everything smoothly.
- Not oiling the molds. If you skip this step, you may struggle to get your candle holder out. Always oil the inside of the molds to prevent sticking.
- Rushing the curing process. Giving the concrete adequate time to cure is key to proper strength. Don't be tempted to demold too early!
- Skipping the sanding step. Not smoothing the edges can lead to sharp points that aren't safe. Always take the time to sand down the edges.
- Using too much water. This can create a runny mix that doesn't hold its shape. Stick to the recommended water measurements closely!
Make It Your Own: Variations and Ideas
- Experiment with colors. Use different shades of acrylic paint to create a vibrant look or a chic ombre effect.
- Try different mold shapes. You might explore square or oval molds for varied designs—don’t be afraid to get creative!
- Mix in sand. For a unique texture, add some sand to the concrete for a more distressed finish.
- Custom sizes. Scale your design up or down to create small votive holders or larger statement pieces for your table centerpiece.
- Gift it! Package your lovely creation with a cute candle to surprise a friend or family member.
I hope you feel inspired to make this project your own! There’s something truly satisfying about crafting something functional and beautiful. You’ve got this!
Before You Go
Pin this for the next rainy afternoon: Save this project for when you’ve got some time and the materials ready to create your own chic concrete candle holder! Come back and tell me how it went: I really want to hear about your experience, so don't hesitate to ask any questions or share how your project turned out, no matter how it goes! Show off what you made: I can’t wait to see your finished candle holders! Enjoy crafting!