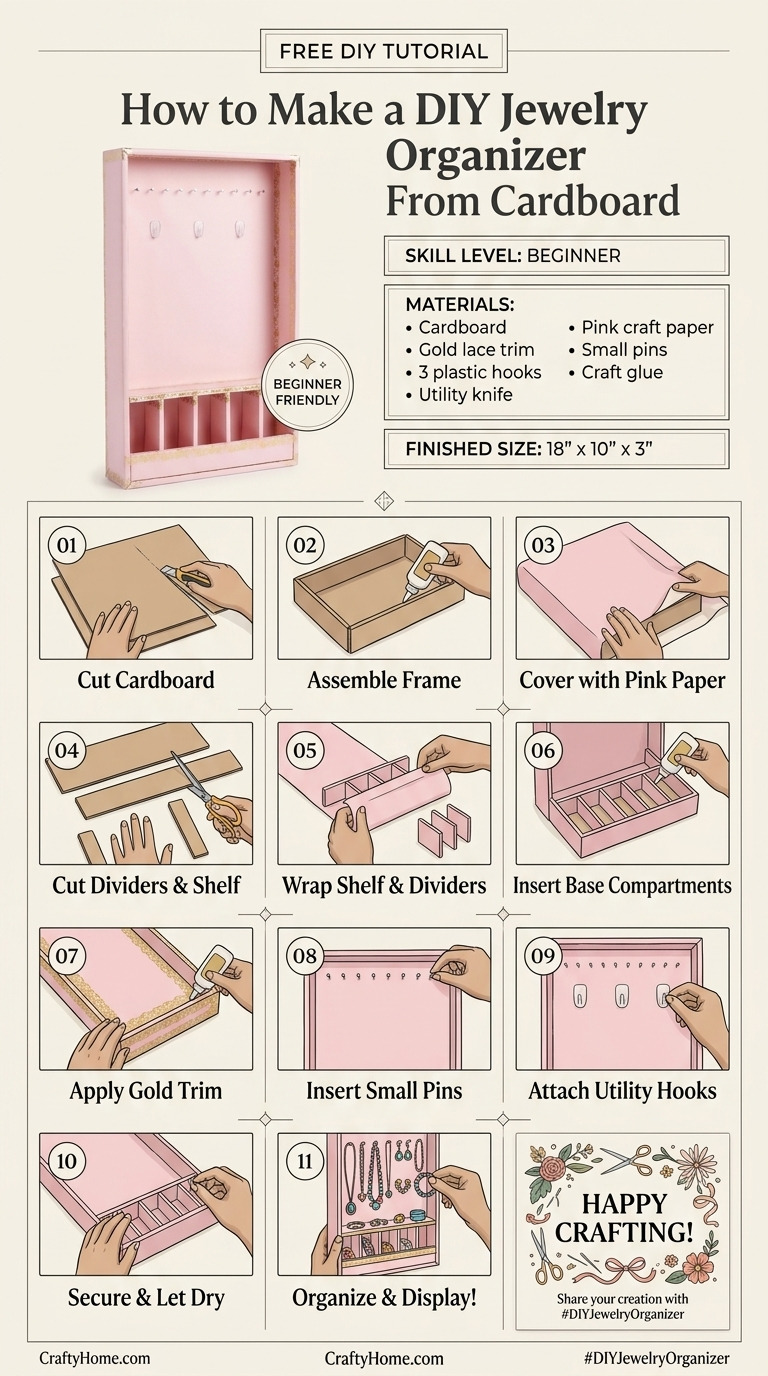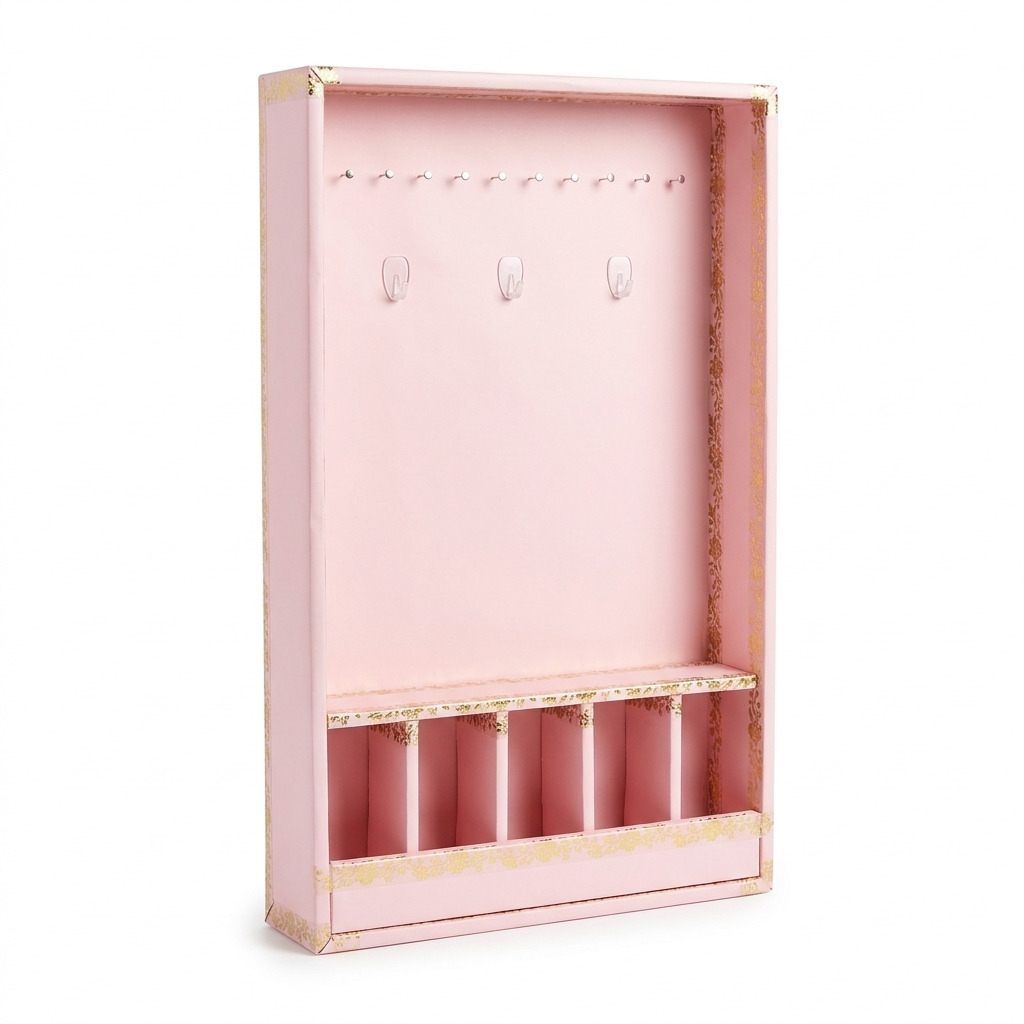
There’s something so satisfying about making a functional item from materials you already have laying around. Last winter, I found myself with a mountain of cardboard boxes from online deliveries. I hated the thought of tossing them out, so I decided to turn them into something useful. After a little imagination and some craftiness, I crafted a beautiful jewelry organizer that holds my favorite earrings, necklaces, and bracelets. Now, it lives on my dresser, keeping everything tidy and easy to access.
This project is perfect for beginners, requiring only basic materials and tools you likely have at home. Plus, the best part is that you can customize it to fit your space and style. I’m excited to take you through every step, so let’s dive in!
[Descriptive image caption of the finished project]
What You'll Need
Materials:
- Cardboard: 3 large flat pieces, at least 1/8 inch thick, around 12” x 24” each. (This will form the structure.)
- Glue: White craft glue or hot glue (if using hot glue, a glue gun is necessary). (Craft glue is less messy and easier to work with, while hot glue sets faster.)
- Wrapping Paper or Scrapbook Paper: 2 sheets, 12” x 12”, for covering (optional in color/style). (This is for decorating and personalizing your organizer.)
- Decorative Tape or Washi Tape: 1 roll, about 0.5 inches wide, for edging. (Adds a lovely touch at the seams.)
- Cardstock: 2 sheets, 8.5” x 11”, for additional dividers (optional). (If you want to create compartments to separate your jewelry.)
- Push Pins: 10-15, for hanging necklaces (optional). (Great for keeping necklaces untangled and easy to access.)
- Small Hooks (optional): 3-5 adhesive hooks, for hanging earrings or necklaces. (A helpful addition for maximum organization!)
Tools:
- Craft Knife: Utility knife or X-Acto knife for clean cuts. (Be careful and take it slow; a steady hand leads to better results!)
- Ruler: 12 inches long for measuring. (Gives you accurate measurements for your cutting.)
- Pencil: For marking measurements. (You want to be precise, so don't skip this step!)
- Cutting Mat: A surface to cut on, protecting your workspace. (Very handy to avoid damaging your table or floor.)
- Scissors: For trimming paper or tape. (You’ll need these for finer cuts!)
- Hot Glue Gun: If using hot glue, including glue sticks. (A good option for quick adhesion.)
- Safety Equipment: Safety goggles for protection while cutting. (Better safe than sorry!)
How to Make It, Step by Step
Step 1: Prepare the Cardboard
Begin by gathering all your materials and tools on your workspace. Then, measure and cut the following cardboard panels:
- Back Panel: 12” x 24”
- Side Panels: Two pieces at 12” x 4”
- Bottom Panel: 10” x 4”
- Divider Pieces (optional): Five pieces at 2” x 4”
Using your craft knife and ruler, carefully cut along the lines you marked. Make sure to press firmly with the knife to achieve clean cuts.
Tip: A cutting mat protects your surface and absorbs blade pressure, which can help with precision.
Step 2: Cover the Cardboard Panels (Optional)
If you’re adding an extra layer of style, now is the time to lay your cardboard on the wrapping paper or scrapbook paper.
- Trace around the cardboard with a pencil and then cut out the paper pieces, making them slightly larger than the cardboard (around 14” x 26”).
- Use glue to adhere the wrapping paper to the cardboard panels. Make sure to smooth out any bubbles while applying the glue.
Allow the glued pieces to dry for about 30 minutes. This will ensure everything sets properly.
Step 3: Assemble the Structure
Once your panels are dry, it’s time to bring everything together.
- Start by applying glue to the edges of the back panel and stick the two side panels vertically (with the 12” side down).
- Hold them in place until the glue begins to set. If you’re using hot glue, this should take about 1-2 minutes; with craft glue, give it 10-15 minutes.
Step 4: Attach the Bottom Panel
After your side panels are secure, apply glue to the bottom edges of each side panel. Attach the bottom panel (10” x 4”) and ensure it's laying flat. Hold this in position until it sets completely.
Step 5: Insert Divider Pieces (Optional)
If you want to create sections for organizing, glue the optional divider pieces inside your organizer vertically. Space them evenly to suit your needs. Let this dry for at least 15 minutes.
Step 6: Add Decorative Tape
To give your organizer a polished look, use washi tape to cover all the visible edges and seams. This not only boosts the aesthetic appeal but also adds a little stability to your edges.
Step 7: Add Push Pins or Hooks (Optional)
Finally, attach push pins or adhesive hooks to the back panel for hanging necklaces or earrings. Space them out evenly, leaving room to accommodate your jewelry without tangling.
Assembly & Finishing
After everything is glued, let your organizer dry completely for at least 1-2 hours. Take a moment to check for any loose pieces and apply extra glue where needed. If you want to go the extra mile, seal the outer edges of your panels and tape with a clear glue or sealant.
Common Mistakes to Avoid
- Rushing the glue. Allowing glue to dry is crucial; otherwise, the structure may fall apart or become flimsy. Be patient!
- Cutting unevenly. If you don’t follow straight lines or cut slowly, you may end up with jagged edges. Measure twice to avoid this mistake.
- Skipping safety gear. Using sharp tools can lead to accidents. Protect your eyes with goggles while you’re cutting.
- Not considering jewelry weight. If you’re hanging heavier items (like chunky necklaces), ensure that your structure is firm enough to handle the weight.
- Overloading compartments. It's easy to pile on jewelry, but this can cause disorganization. Make sure dividers can hold what you’re putting in them!
Make It Your Own: Variations and Ideas
- Change Up the Colors: Experiment with different wrapping paper designs to match your room decor or mood.
- Use Funky Shapes: Instead of a classic rectangle, try making a round or star-shaped organizer to add uniqueness.
- Adjust the Size: Scale down for a travel jewelry organizer or enlarge it for more storage.
- Seasonal Themes: Change the style based on seasons or holidays by swapping out the wrapping paper.
- Gift Ideas: Decorate one as a thoughtful gift for a friend; personalize it in their favorite colors!
I can’t wait to see how you make this project your own. Just remember to embrace the creative process, and have fun with it!
Before You Go
Pin this for the next rainy afternoon: Save this tutorial for when you’re ready to create your stylish DIY jewelry organizer, so you’ll have all the steps and materials handy.
Come back and tell me how it went: I would love to hear about your experience! No question is too simple, and I’m just as eager to hear about a project that went sideways as one that went perfectly!
Show off what you made: Don’t be shy! Feel free to share your beautiful finished creation when you're done.