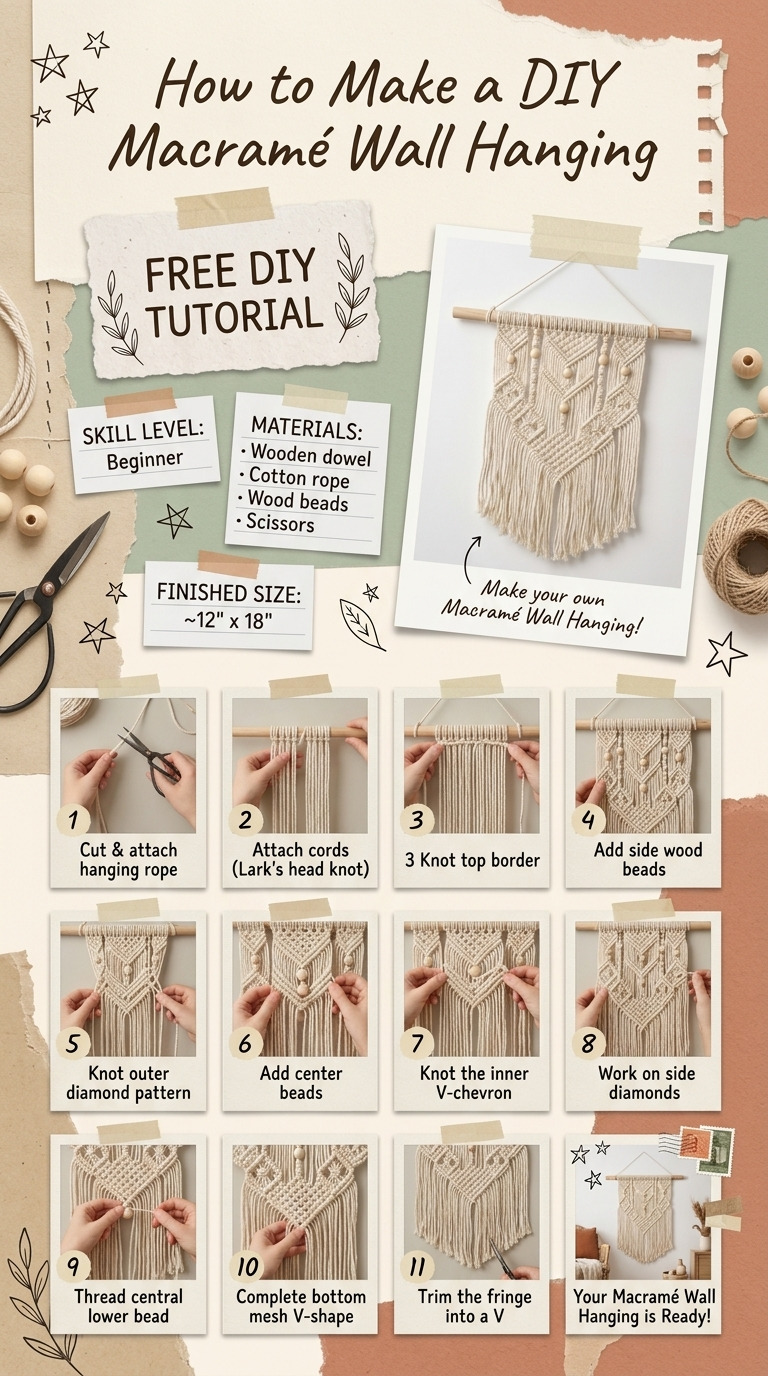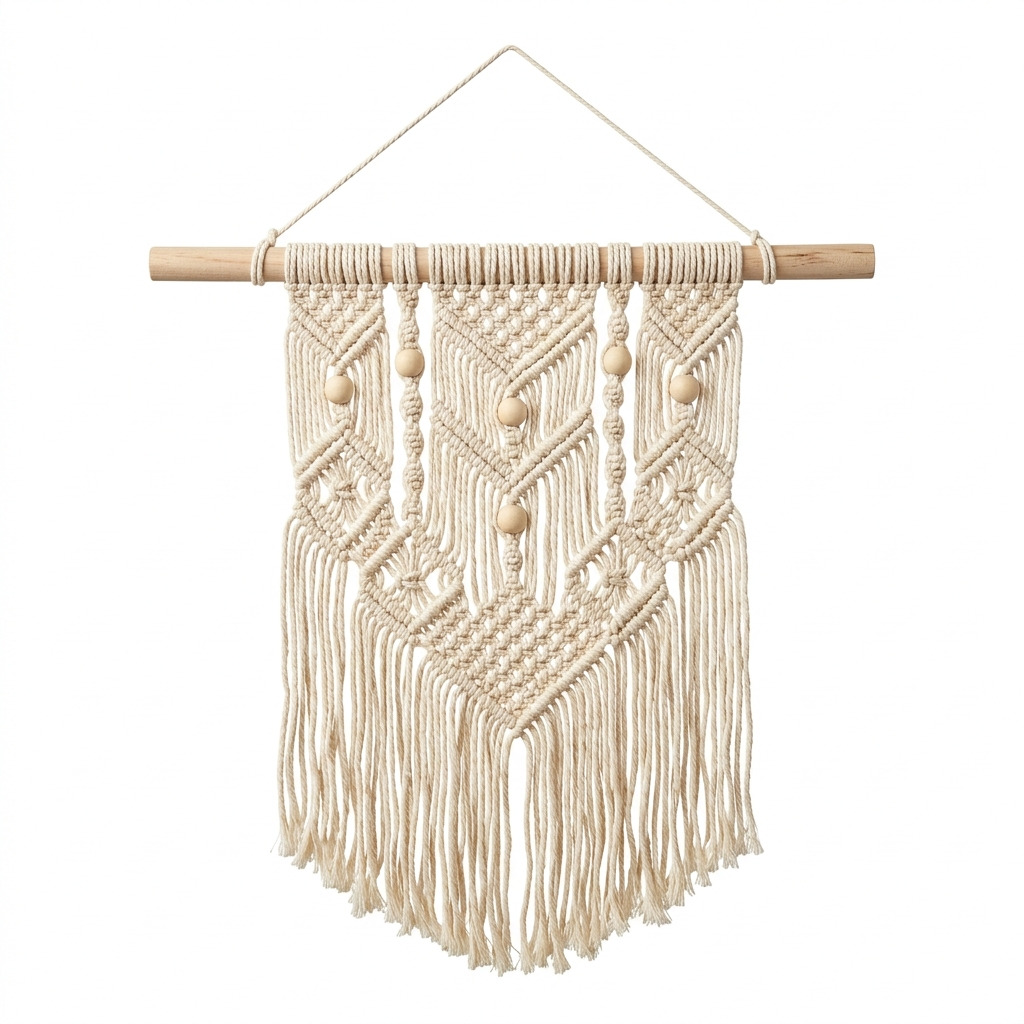
Last winter, I found myself scrolling through Pinterest, and I kept seeing these gorgeous macramé wall hangings. They looked so intricate and beautiful! I didn’t want to fork out a ton of money on something I could probably make myself. Plus, how charming would it be to have such a unique piece in my home? I decided to give it a go, and let me tell you, I fell in love with the process.
This DIY macramé wall hanging now hangs proudly in my living room, adding a delightful boho touch. It was not only fun to make but also super satisfying to see my handiwork come to life. Seriously, if you’re looking to spruce up your space with some art that’s totally handmade, this project is for you. And the best part? I’ll walk you through each step!
[Descriptive image caption of the finished project]
What You'll Need
Materials:
- Cotton macramé cord:
- Quantity: 3 skeins
- Thickness: 4mm
- Color: Natural or Cream (I love the earthy tones, but you could pick any color that matches your style!)
- Wooden dowel:
- Quantity: 1
- Size: 1 inch diameter, 24 inches long (you can adjust the size based on your preference).
- Fringe (optional for a longer look):
- Additional cotton cord or scrap pieces of macramé cord (this can be a fun way to use up leftovers).
- Scissors:
- Quantity: 1
- Measuring tape:
- Quantity: 1
- Tape:
- Quantity: 1 roll (this helps secure the cord while you work).
- Wooden beads (optional):
- Quantity: 4-6, natural wood finish (they add a lovely decorative touch).
Tools:
- Hot glue gun (optional, for securing knots)
- Ruler (for measuring cord lengths)
- Work surface: A clean, flat area (like a table or the floor).
- Safety equipment: None needed, but it’s good to have a ventilated area when you’re using a hot glue gun.
How to Make It, Step by Step
Step 1: Prepare the Dowel
Start by making sure your dowel is clean and dry. If you notice any rough edges, lightly sand them down with sandpaper. This will make it nicer to handle and easier to work with.
Step 2: Attach Cords to the Dowel
Now we’re going to attach our cords! Cut 12 pieces of the cotton cord, each 8 feet long. Fold each piece in half to create a loop.
Here’s how to attach it:
- Position the loop behind the dowel.
- Pull the ends of the cord through the loop and pull tight.
- Repeat this for all 12 cords. Make sure they are spaced evenly along the dowel.
Tip: If you find it a little tricky to keep the cords evenly spaced, you can use tape to temporarily secure the ends to your workspace.
Step 3: Create the First Row of Knots
Gather four sets of cords (taking two cords from each outer side), and tie a square knot. To do this:
- Take the left cord (A) over the center cord (B) and under the right cord (C).
- Then take the right cord (C) over the center cord (B) and under the left cord (A).
- Pull everything tight, and voilà! You’ve made your first square knot!
Repeat this for the next row with the remaining cords. You should end up with two square knots.
Tip: If your square knots seem a little loose, gently pull on the cords until they’re snug and aligned.
Step 4: Continue Knotting
Keep going! Depending on the look you want, continue making rows of square knots. I like to space them about 4 inches apart. Aim for about 12-15 rows of knots for a nice, balanced look.
Step 5: Create Fringe
After all that knotting, it’s time to add some personality with fringe! Cut the ends of your cords to your desired length. Generally, a length of 6–8 inches looks great.
Step 6: Finishing Touches
If you've opted for those wooden beads, this is where they come in. String a few onto the ends of some of the fringe for an extra pop of style. Then trim any excess cord to make sure everything is even.
Step 7: Hang the Wall Hanging
Now for the best part! Use tape to secure the dowel onto your wall, or you can hang it using a command hook. Just like that, you have a beautiful macramé wall hanging ready to admire!
Common Mistakes to Avoid
- Using too thick of cord. This can make the knots difficult to tie securely. Stick to the 4mm thickness for easier handling.
- Skipping measurements. Make sure to measure all your cords accurately before cutting. You don’t want to run short halfway through!
- Not pulling knots tightly. Loose knots can make your design look uneven. Always give your cords a gentle tug to secure those knots properly.
- Rushing the drying time for glue. If you use a hot glue gun, let it sit for 30 minutes to an hour. Rushing this will mess up the integrity of your design.
- Ignoring cleaning. Mud and dust can really dull your beautiful piece. Remember to gently shake it out or use a soft brush to clean it!
Make It Your Own: Variations and Ideas
- Change up the knots! Try using different macramé knots like spiral or half hitch for a new look.
- Choose vibrant colors! Use dyed cotton cord or fabric dye to create an eye-catching design that matches your decor.
- Add more fringe! Opt for longer fringe for a dramatic effect, or even mix in different lengths for a whimsical look.
- Experiment with sizes! Create a larger piece for a statement wall or smaller versions as gifts for friends.
- Go for a seasonal look. Switch colors or add seasonal embellishments to make it festive throughout the year.
You’ve got this! I hope you enjoy creating your macramé wall hanging just as much as I did.
Before You Go
Pin this for the next rainy afternoon: Save this tutorial so you can have the steps to hand when you’re ready to start working on your beautiful macramé wall hanging.
Come back and tell me how it went: Don’t hesitate to reach out if you have questions, no matter how basic. I'd love to help out, and remember, it's perfectly fine if your project doesn’t go exactly as planned.
Show off what you made: I’m excited to hear how your wall hanging turned out! Your creativity is what counts, and I'm sure your piece will look fantastic!