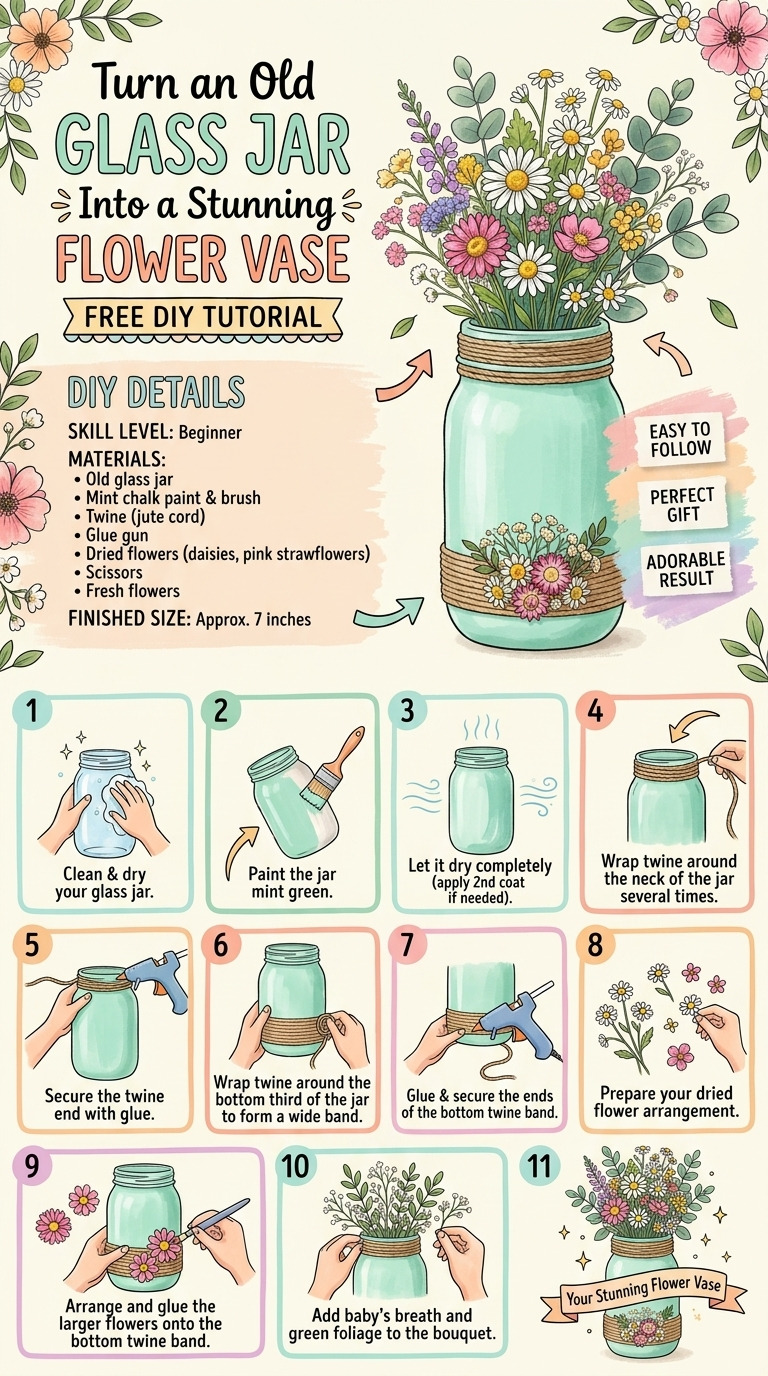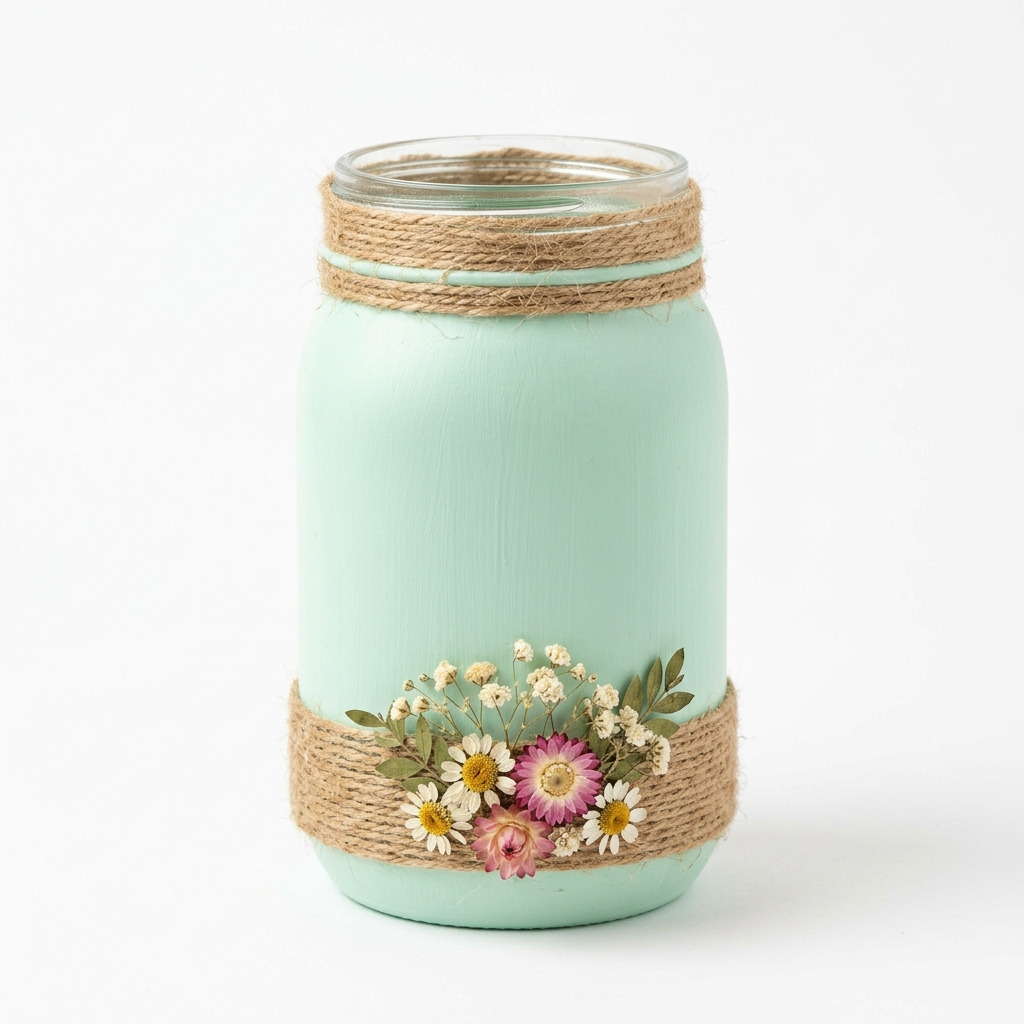
I love finding new uses for items that I might otherwise toss out, and that’s exactly how I came up with this project! Last winter, I found a dusty old mason jar hidden away in my kitchen cabinet. It had been sitting there for ages after I’d used the last of the homemade preserves. Instead of throwing it away, I decided to give it a new lease on life as a charming flower vase. It’s not only perfect for my fresh bouquets but also makes a sweet decorative piece when filled with dried flowers.
Transforming that humble jar into something beautiful felt so rewarding, and I'm thrilled to share this easy project with you. Whether it’s for your own home or a thoughtful gift for a friend, you’ll see just how simple it is to make a stunning flower vase from something old and forgotten. Let’s dive into the details together!
[Descriptive image caption of the finished project]
What You'll Need
Materials:
- Old glass jar – 1, approximately 16 oz (like a mason or pickle jar) — This will be the base of your vase.
- Twine or jute rope – 1 roll, 10 yards — This adds a rustic charm to the vase.
- Acrylic paint (optional) – 1 small bottle in pastel colors (think pink, mint green, or lavender) — This gives you the option to customize the look of your jar.
- Clear-drying craft glue – 1 small bottle — You'll use this for securing twine and any embellishments.
- Decorative embellishments (optional) – Your choice of dried flowers, ribbon, or beads — This adds a personal touch to your vase.
- Water sealant or mod podge (optional) – 1 small bottle for sealing painted areas — This helps protect your paint if you choose to go that route.
- Sandpaper – 1 piece, 120 grit (if needed for smoothing) — Use this if you want to make the jar's surface a bit smoother for painting.
Tools:
- Paintbrush – 1 medium (around 1-inch width) — For applying paint if you want that option.
- Scissors — To cut your twine and any other materials.
- Hot glue gun and glue sticks — For securely attaching the twine and embellishments.
- Ruler — For measuring twine and ensuring straight lines.
- Pencil – for marking on the jar if needed.
- Clean cloth — To wipe down the jar after cleaning.
- Safety equipment: Gloves (recommended when handling glue or paint) — To keep your hands safe and clean.
How to Make It, Step by Step
Step 1: Marking & Cutting Twine
Measure and cut a piece of twine about 24 inches long. This gives you enough length to wrap around the jar while leaving some extra for knotting. I always err on the side of more twine — you can always trim it down afterward.
Step 2: Painting (optional)
If you want a pop of color on your vase, now's the time to paint the jar. Using your paintbrush and acrylic paint, apply one or two coats to the outside of the jar. Let the first coat dry for about 30 minutes before applying a second coat if needed. After the last coat, allow the paint to cure for at least 1 hour. I learned the hard way to be patient with drying times — my first attempt had smudges that were so disappointing! If you want extra protection, you can seal it with a clear-drying sealant and then wait another 30 minutes.
Step 3: Twine Wrapping
Now for the fun part! Start just under the lip of your jar. Apply a line of hot glue and press one end of the twine into the glue. Begin wrapping the twine tightly around the jar, adding more glue every couple of inches to keep it secure. Keep wrapping until you reach the base of the jar. When you finish, cut the twine, leaving a tail of about 2 inches, and secure it with more hot glue. Remember, a tight wrap makes the best final look!
Step 4: Adding Embellishments (optional)
This is where you can really make your vase unique! You could glue some dried flowers at the base of the twine, create a cute bow from ribbon, or string beads onto your twine. Use the hot glue to attach any embellishments, and don’t be afraid to get creative! I added some cute dried flowers from my garden, and it really made the jar sing.
Assembly & Finishing
To assemble your vase, ensure everything is glued down well. If you've painted the jar, touch up any areas needing a little extra attention. Once everything is secure and looking pretty, fill your vase with fresh or dried flowers, trimming them to fit just right. Imagine how lovely this will look on your kitchen table or as a centerpiece for gatherings!
Common Mistakes to Avoid
- Not cleaning the jar properly. If there's leftover residue, the paint won’t stick well, leading to peeling. Always be thorough with your cleaning!
- Skipping drying times. I’ve rushed this before, and it resulted in smudged paint. If you don’t wait for your paint to dry fully, you might end up with a mess!
- Overlapping twine too much. This can make your final look messy. Keep your twine neat and close together for a cleaner finish.
- Using the wrong glue for embellishments. Don’t use regular craft glue for attaching twine and embellishments! Hot glue keeps everything securely in place.
- Applying paint too thickly. This will lead to drips, which just don’t look nice. Instead, go for thin and even coats to avoid that.
Make It Your Own: Variations and Ideas
- Use colored twine! Instead of natural twine, try a bright color to match your decor. It can become a bold statement piece!
- Experiment with patterns. If you feel adventurous, alternate between twine and ribbon for a fun layered look.
- Try different sizes of jars. A small jar can be a lovely bud vase, while a larger jar can make a stunning centerpiece.
- Add seasonal decorations. Change the embellishments with the seasons; pinecones in the winter or seashells in the summer can really swap up your look!
- Make a set. Gather a few different jars and use the same twine but experiment with colors or embellishments for a coordinated display.
This project is all about creativity and personal touch. You’re not just replicating what you see — you’re creating something truly yours!
Before You Go
Pin this for the next rainy afternoon: Save this post so you can easily find the guidance on jar measurements, drying times, and those little tips we talked about for your next crafting session.
Come back and tell me how it went: I absolutely want to hear your crafting stories! No question is too basic—if things went sideways, I’d love to know that too!
Show off what you made: I’d love to see your stunning flower vases — whether they turned out perfectly or not! It’s all about creativity and having fun with the process. Enjoy crafting!