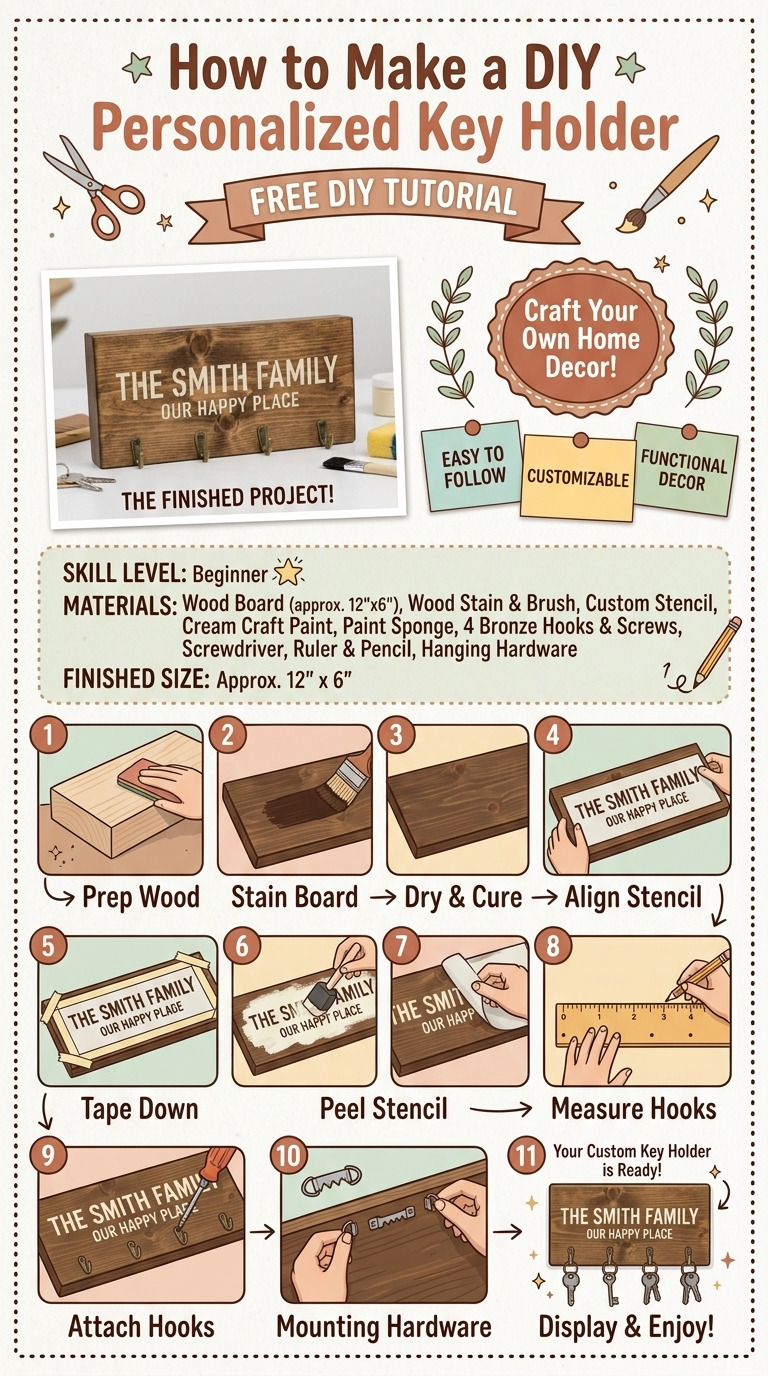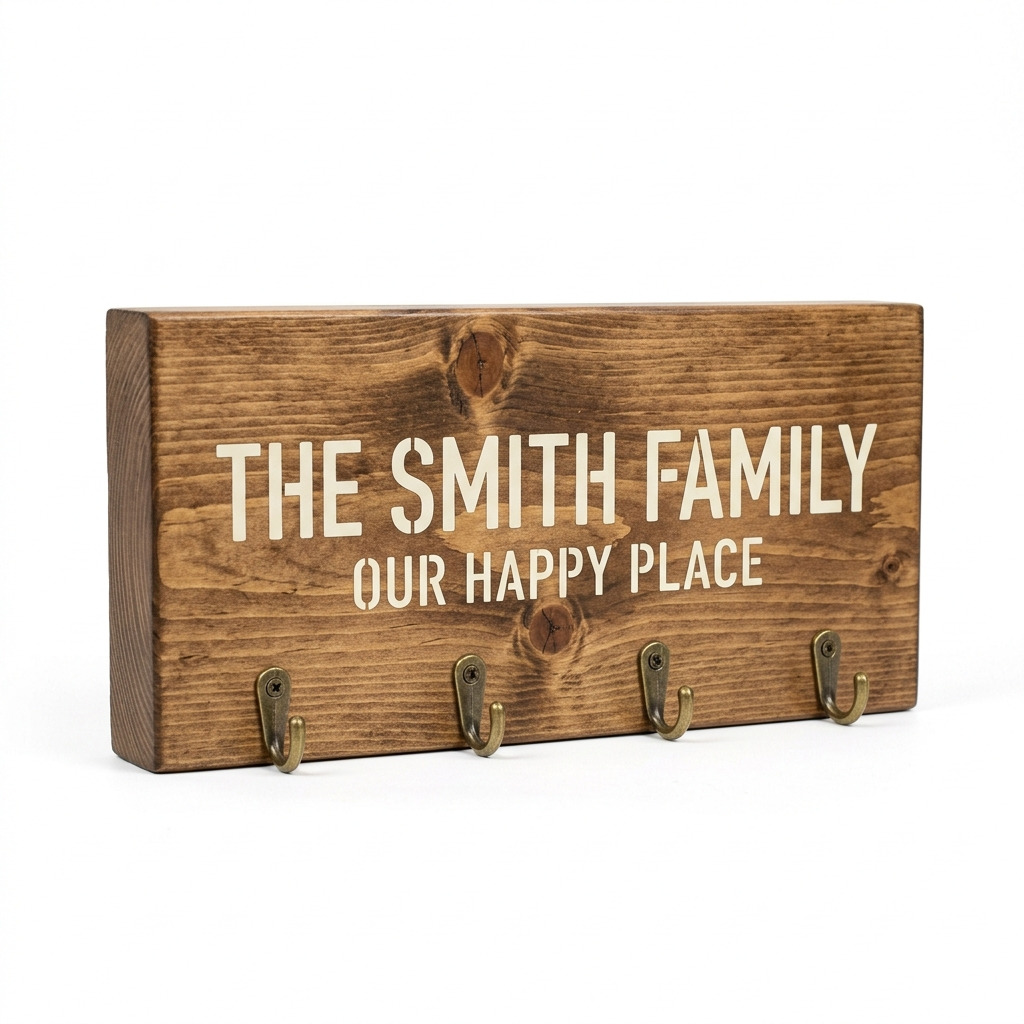
I’ve always struggled with keeping track of my keys. No matter how many hooks I had, they always seemed to wander off into some mysterious vortex. One winter afternoon, I decided it was time for a change. I wanted a dedicated spot for my keys that not only kept them organized but also reflected my personality. That’s when I came up with the idea of making a personalized key holder!
This DIY project is not just practical; it’s also a beautiful addition to my entryway. I can customize it with colors and designs that chime with my style. Now, every time I hang up my keys, I feel a little spark of joy as I admire my handiwork. This project is truly easy, and I’m excited to share every step with you!
[Descriptive image caption of the finished project]
What You'll Need
Materials:
- Wood plank (1 inch thick): 1 piece measuring 12 inches x 6 inches (You can use plywood or pine; I recommend pine for a softer, easier finish)
- Wood stain or paint: 1 small container (Pick any color you love! I used walnut stain, but navy blue is beautiful too)
- Key hooks: 4 standard metal hooks (2-inch length; brass finish or antique style adds a nice touch)
- Sandpaper: 1 sheet each of 120-grit and 220-grit (this will make your wood feel smooth to the touch)
- Letter stickers or a stencil: 1 set (for personalizing with your name or a fun phrase)
- Clear sealant (polyurethane or acrylic sealant): 1 small container (choose matte or glossy finish based on preference)
- Small sawtooth picture hanger or wall hooks: 1 for mounting (this will allow you to hang your key holder securely)
- Varnish or topcoat (optional for added finish — it gives an extra layer of protection)
Tools:
- Safety goggles (keeping your eyes safe is a must!)
- Dust mask (important for sanding)
- Ruler or measuring tape
- Pencil (for marking times)
- Paintbrush (1 inch wide) (to apply stain or paint evenly)
- Drill with a 1/8 inch drill bit (needed for your key hook holes)
- Hot glue gun and glue sticks (optional, if you want to add decorative embellishments like a small picture or charm)
- Clamps (optional, but useful if you want to stabilize the wood while working)
How to Make It, Step by Step
Step 1: Sand the Wood
Start by sanding both sides and the edges of your wood plank. Begin with the 120-grit sandpaper to remove any rough spots. Once that’s done, switch to the 220-grit sandpaper for a smooth finish. You want it to feel nice enough that you’d run your bare hand along it without any splinters.
Tip: I once tried staining without proper sanding, and the result was disappointing. The stain soaked unevenly, so don’t skip this step!
Step 2: Wipe Down the Wood
After sanding, take a damp cloth and wipe down the wood plank. This will remove all the dust created from sanding. If you skip this, any dust left can ruin your beautiful finish.
Step 3: Stain or Paint the Wood
Now it’s time for the fun part! Using your paintbrush, apply your chosen stain or paint evenly across the surface of the wood. Make sure to cover every area. Let it dry completely for about 1-2 hours. If you feel like it’s needed, apply a second coat once the first one has dried fully.
Step 4: Personalize the Wood
Choose where you want to place your lettering or design. I like to arrange my letter stickers or stencil to see how it looks before sticking them down. When you’re happy with the placement, press them down firmly to prevent any bleeding of paint. If using a stencil, secure it with painter’s tape.
Step 5: Drill Holes for Hooks
Now we need to add the hooks. Measure and mark where you want them to go. Space them evenly, about 2 inches apart, and make sure they’re centered and at least 1 inch away from the edges. Using your drill and the 1/8 inch drill bit, carefully drill holes in the marked spots. Take it slow to avoid splintering.
Tip: I made the mistake once of drilling too close to the edge, which caused the wood to split. Measure carefully!
Step 6: Attach Key Hooks
Insert the metal key hooks into the holes you just drilled. Twist them in until they’re snug. Make sure they are secure; you don't want keys falling off!
Step 7: Sealing
Once everything is dry and the hooks are in place, it’s time to seal the wood. Use a clean paintbrush to apply a clear sealant over the entire wood surface. This helps protect your work and gives it a finished look. Follow the manufacturer’s drying times, generally about 2-4 hours.
Step 8: Mounting Preparation
Flipping your wood over, attach the sawtooth hanger in the center of the back side. Secure it according to the instructions on the package; this is simple but necessary for a nice, easy hanging.
Common Mistakes to Avoid
- Rushing the glue: If you hurriedly move on before the sealant dries, it can cause the finish to bubble up. Always wait for it to be completely dry!
- Misplacing hooks: Always double-check your measurements. If your hooks get crowded, it makes it tough to grab keys.
- Skipping the sanding: Seriously, don’t try to cut corners here — it can lead to a rough finish.
- Too much stain or paint: If it pools in areas, you may end up with a sticky, uneven finish. A thin, even coat is ideal.
- Ignoring safety: Wood dust can be nasty. Always wear your mask and goggles while working!
Make It Your Own: Variations and Ideas
- Color Choices: Change up the wood stain or paint color depending on the season!
- Different Hook Styles: Try using decorative knobs instead of standard hooks for a whimsical look.
- Add More Letters: Celebrate family names, initials, or fun quotes — get creative!
- Embellishments: Use a hot glue gun to add fun decorations, like small pictures or natural elements like twigs.
- Size Variations: Make a larger version by using a bigger wood plank. Perfect for larger families and more keys!
This key holder is all yours now! I can’t wait to see how you all put your personal stamp on it!
Before You Go
Pin this for the next rainy afternoon: Save this project to make your very own personalized key holder right when you have the time and materials ready. I promise it’s worth it! Come back and tell me how it went: I’d love to hear how your project turned out and any fun tweaks you made along the way. No question is too basic, and I’m all ears for your crafting adventures! Show off what you made: Whenever you’re ready, feel free to share your beautiful key holder with the world. Happy crafting!